Describing UI state with data
In this post we build a small example UI following a data-first approach. What the user sees is just a representation of a piece of data, the app state. And when she interacts with the interface, she is just applying transformations to that piece of data.
If you think about it, the majority of (if not all) software programs are just transformations of data. Given input A, the program P produces output B. It's easy to see this pattern in small Unix command-line tools, but you could also apply it to larger systems, and why not a user-interface?
When looking at a mockup of a UI screen, along with some use-cases (ex: user clicks here, this happens), imagine what could be the JSON (or other data format) representation of that screen? What transformations to that JSON would cover the given use-cases?
In the land of front-end web applications, new libraries and patterns really encourage to think that way (ex: React, Flux, Om, DataScript). Even the "good old" MVC architecture gives data a front-row seat, in the M for "Model" (unfortunately in MVC, sometimes part of the app state ends up in the V for "View"). Modeling a UI as data is an important step, and it's worth taking time away from the keyboard to explicitly think it through.
Disclaimer: I don't pretend to invent anything new in this post. The concepts used already exist, and libraries and frameworks have already been written around them. What I'd like to do is simply follow the process of building a small example app, focus on the concepts and not a particular framework or library, and hopefully show along the way some interesting things and advantages related to this approach. The example is pretty simple, so some things might seem trivial or overkill, but the idea is that the same concepts applied to larger apps make things easier to reason about and work with.
Sketching the interface and user experience
When building an app, solving an actual problem and providing a good user experience is what matters most. The user doesn't care how elegant our data model is. So it's a good idea to take a step back, start on paper, sketch out what the app would look like and what use-cases it would need to cover.
The example app we'll be building here is a screen that's part of a larger app, some kind of game. This screen should allow the user to build an army before going into battle, based on units that are available to her as well as the resources she has gathered. Here's what that could look like:
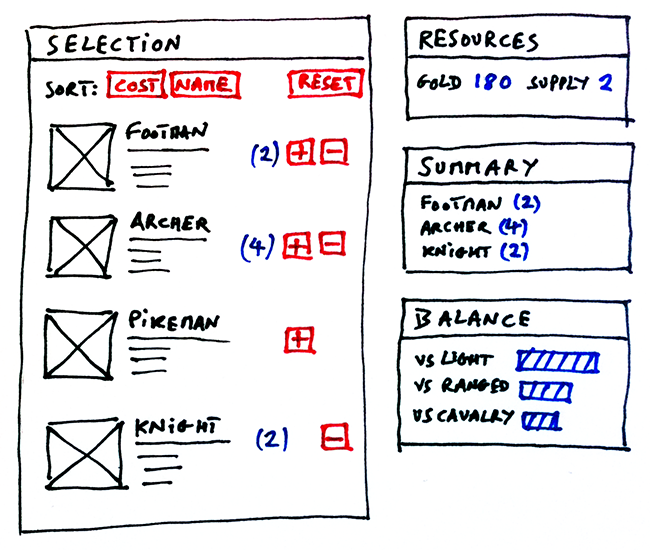
What are the use-cases of this app? Let's separate them into two groups. The first group covers what the user can do:
- When I click the "+" button, it adds one unit of that type to my army
- When I click the "-" button, it removes one unit of that type from my army
- When I click the "Reset" button, it removes all units from my army
- When I click on of the "Sort by" buttons ("Cost", "Name"), it sorts the unit selection list and the army summary by the corresponding property
The second group of use-cases describes what the user can see:
- I can see a sorted list of units available, and each unit will have a "+" button visible if I can add it, and a "-" button visible if I can remove it
- I can see the resources I have remaining
- I can see a sorted summary of units I have so far in my army
- I can see a graph to help me evaluate the strength of my army against different types of units
Now that we have the visuals and use-cases sketched out, we can dive into code. The full and final version of the code presented next is available on GitHub.
Modeling the app state as data
After the sketch, this is probably the most important (and fun) part, so it's worth spending some time thinking about it (our example app is pretty simple, but larger apps will require more thought). It's also worth noting that there are different ways to model things, and no right or wrong. Whatever model we come up with however, we will make sure to respect the following:
- We identify and separate "core state" from "derived state". We only store the core state in the "app state" data object, and we keep it to the bare minimum (i.e. if it can be derived from something else, don't store it).
So what would that look like in our example?
- We need a list of the units with their properties that is currently available to the user (maybe fetched from the backend storing the game progress)
- We need the resources the user has available at that stage in the game (fetched from the backend too)
- For each unit, we'll need a counter (initially set to 0) that we can increment every time the user adds a unit of that type to her army
- We need to keep track of which property the list of units is sorted by ("cost" or "name")
As a JavaScript object, here is one way we can model our app state:
{
  resources: {gold: 1500, supply: 10},
  sort: 'cost',
  units: {
    archer: {
      count: 0,
      name: 'Archer',
      description: 'Ranged unit, strong vs light armor',
      cost: 140,
      attack: 5,
      hp: 40,
      bonus: {light: 4}
    },
    // ...
  }
}
Note that this object only contains the "core state". For example, the resources attribute holds the starting resources and we don't keep track of the remaining resources the user actually sees on screen. Indeed, the remaining resources are a function of the starting resources and the count of each unit, so it is "derived state":
f(starting resources, count of each unit) -> remaining resources
f(core state) -> derived state
The same goes for the sorted unit selection list (the core state just holds a map of available units), the sorted army summary, and the data behind the army balance graph. We'll call these "projections", and we'll see more about them later.
We verified that this model of the app state, with the appropriate "projections", covers the second group of use-cases (what the user can see). What about the first group (what the user can do)?
- Adding/removing a unit changes its
countproperty - Clicking "Reset" changes every unit's
countback to 0 - Clicking a "Sort by" button changes the
sortattribute
Our data model for the app state seems to work, so we can move on to the next step.
Writing a console version of the app
Let's create some functions that will transform the state object defined previously.
We'll be using the data structures from the library immutable (Map, List). The two main reasons for this are:
- Projections from core state to derived state often involve manipulating objects (adding/removing properties, etc.). Instead of having to worry about "defensive cloning" of objects and arrays, we can just use immutable persistent data structures and focus on more important things.
- The library has a lot of useful methods for manipulating data structures (
map,reduce,merge,getIn, etc.), which is convenient since manipulating data is really the focus here.
Even if you've never worked with immutable before, the API is straightforward and you should be able to follow along without any problem.
We'll first create a State.initial() function that returns the initial app state:
State.initial = function() {
  return Immutable.fromJS({
    resources: {gold: 1500, supply: 10},
    sort: 'cost',
    units: {
      footman: {
        count: 0,
        // ...
      },
      archer: {
        count: 0,
        // ...
      },
      // ...
    }
  });
};
Now we'll create Actions to cover the use-cases where the user interacts with the app. An action is just a function that takes the current version of the app state and returns a new state:
action(current state) -> new stateFor example, let's implement Action.select(state, unit) called when the user clicks on the "+" button next to a unit:
Actions.select = function(state, unit) {
  return state.updateIn(['units', unit, 'count'], 0, function(count) {
    return count + 1;
  });
};
We can immediately try it out in the console:
var s = State.initial();
s.getIn(['units', 'archer', 'count']); //-> 0
s = Actions.select(s, 'archer');
s.getIn(['units', 'archer', 'count']); //-> 1
You can find the rest of the actions implemented in Actions.js.
Next we'll create Projections to shape the core application state in a way that's ready to be rendered into a UI component. A projection is simply a function that takes the app state and returns some "derived state" or "view" of the app state:
projection(state) -> viewFor example, let's implement Projections.resourcesRemaining(state) that will be used to populate the remaining resources widget in the UI:
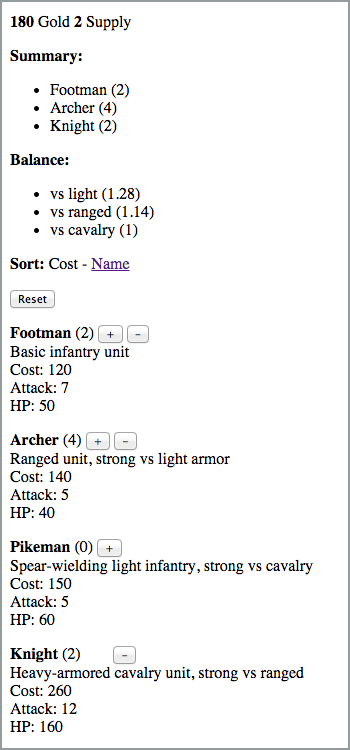
Projections.resourcesRemaining = function(state) {
  var goldInitial = state.getIn(['resources', 'gold']);
  var goldSpent = state.get('units').reduce(function(result, unit) {
    return result + unit.get('count') * unit.get('cost');
  }, 0);
  var goldRemaining = goldInitial - goldSpent;
  // Similar logic for `supplyRemaining` not shown here...
  return Immutable.fromJS([
    {id: 'gold', name: 'Gold', quantity: goldRemaining},
    {id: 'supply', name: 'Supply', quantity: supplyRemaining}
  ]);
};
We can also immediately try it out in the console:
var s = State.initial();
Projections.resourcesRemaining(s).toJS();
// [
//   {id: 'gold', name: 'Gold', quantity: 1500},
//   {id: 'supply', name: 'Supply', quantity: 10}
// ]
s = Actions.select(s, 'archer');
s = Actions.select(s, 'footman');
Projections.resourcesRemaining(s).toJS();
// [
//   {id: 'gold', name: 'Gold', quantity: 1240},
//   {id: 'supply', name: 'Supply', quantity: 8}
// ]
You can find the rest of the projections implemented in Projections.js.
With the functions in the modules State, Actions, and Projections, what we have done is basically create a "console version" of the whole app. We can play around with it in the console, and check that it behaves like we expect it to.
It is also very easy to add unit tests, since these are all just pure functions (no side-effects, given input A they always produce output B) operating on plain data:
- For an action, given this state does it produce the expected new state?
- For a projection, given this state and these parameters, does it produce the expected view?
// test.js
describe('Actions.select', function() {
  it('increments count of selected unit', function() {
    var state = Immutable.fromJS({
      units: {archer: {count: 0}}
    });

    state = Actions.select(state, 'archer');

    expect(state.getIn(['units', 'archer', 'count'])).to.equal(1);
  });
});

describe('Projections.resourcesRemaining', function() {
  it('returns correct quantities of remaining resources', function() {
    var state = Immutable.fromJS({
      resources: {gold: 10, supply: 4},
      units: {
        footman: {cost: 1, count: 1},
        archer: {cost: 3, count: 2}
      }
    });

    var resourcesRemaining = Projections.resourcesRemaining(state);

    expect(resourcesRemaining.getIn([0, 'id'])).to.equal('gold');
    expect(resourcesRemaining.getIn([0, 'quantity'])).to.equal(3);
    expect(resourcesRemaining.getIn([1, 'id'])).to.equal('supply');
    expect(resourcesRemaining.getIn([1, 'quantity'])).to.equal(1);
  });
});
What's more, we don't even need a browser or a DOM for these tests, they can run on the server in Node.
At this point, without even beginning to worry about the browser, HTML, and CSS, we already have all the "business logic" of our app implemented.
Adding the graphical interface
We can finally start rendering our app state and its projections in the browser, and hook up our actions to user interactions. We'll use React for this, not only because it's a popular choice, but also because it fits very well with the pattern "given this piece of data describing my application state, this is how the DOM should look like" (i.e. keeping the DOM in sync with the app state). However, we'll see later that it's fairly easy to switch to another "rendering engine".
We'll also wrap our pure functions in a stateful app object. This is only an implementation detail (the pure functions are the important bit: they hold all the logic, and are the ones we test). The main purpose of this object is to emit an event that will trigger a re-render when the application state changes:
function render() {
  var gold = app.projections.resourcesRemaining()
    .getIn([0, 'quantity']);
  console.log('gold ' + gold);
}
app.addChangeListener(render);

render();
// console log: "gold 1500"
app.actions.select('archer');
// console log: "gold 1360"
Our top-level React component App will listen to these changes and re-render when they happen:
// App.jsx
var App = React.createClass({
componentDidMount: function() {
app.addChangeListener(this.handleChange);
},
componentWillUnmount: function() {
app.removeChangeListener(this.handleChange);
},
handleChange: function() {
// Trigger a re-render
this.forceUpdate();
},
render: function() {
// ...
}
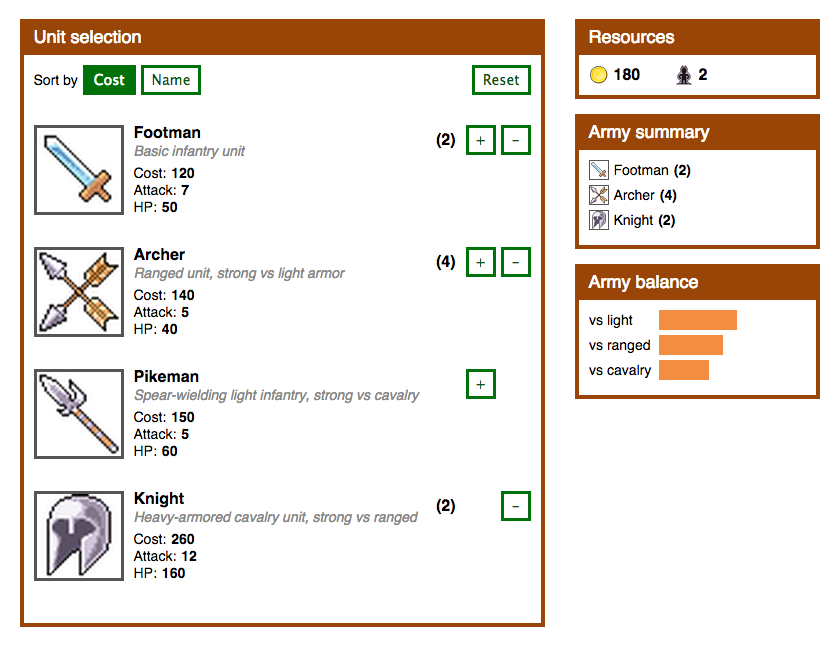
});We'll also start with an "HTML-only" version. CSS can be a big time sink, and we want to get as fast as possible to a usable prototype that we can actually click through and test. (We can even have a designer or other developer work on the CSS in parallel.)
Thanks to the notion of "projections", which massage the app state before it's shown on screen, we can keep our UI components thin and simple. All of the "business logic" is contained in the projection's code, the UI component just maps its result to DOM elements. For the interactions, they are simply implemented by hooking up DOM events (clicks, etc.) to actions.
Let's implement the UnitList component which allows the user to view units that are available and add or remove them from the army. The component simple renders the result of Projections.unitList(state):
// Projections.js
Projections.unitList = function(state) {
  // First, create a list from the `units` map
  var result = return state.get('units')
    .map(function(unit, key) {
      return unit.set('id', key);
    })
    .toList();

  // Next, sort by the appropriate attribute
  var sortAttribute = state.get('sort');
  result = result.sortBy(function(unit) {
    return unit.get(sortAttribute);
  });

  return result;
};
// UnitList.jsx (simplified)
var UnitList = React.createClass({
render: function() {
return (
<div>
{app.projections.unitList().map(this.renderUnit).toArray()}
</div>
);
},
renderUnit: function(unit) {
return (
<p key={unit.get('id')}>
<strong>{unit.get('name')}</strong>
{' (' + unit.get('count') + ') '}
<button
onClick={app.actions.select.bind(null, unit.get('id'))}
style={{opacity: this.isSelectable(unit) ? 1 : 0}}>
{'+'}
</button>
{' '}
<button
onClick={app.actions.remove.bind(null, unit.get('id'))}
style={{opacity: this.isRemovable(unit) ? 1 : 0}}>
{'-'}
</button>
</p>
);
},
isSelectable: function(unit) {
var goldRemaining = app.projections
.resourcesRemaining().getIn([0, 'quantity']);
return goldRemaining >= unit.get('cost');
},
isRemovable: function(unit) {
return unit.get('count') > 0;
}
});This looks pretty nice. But do you see anything we can make better? Remember how we mentioned that all app logic should be contained in projections and actions, and not in UI components? Well, our UnitList component actually still holds some pretty important logic. Let me demonstrate: I run this, and I start adding a bunch of "Footman" units, which are pretty cheap. Oops! At 10 footman, the "+" button is still visible but my remaining supply is 0! Silly me, I forgot to take supply into account in the isSelectable(unit) method. Better yet, I should move both the "isSelectable" and "isRemovable" logic out of the component and into my projection, and add a test for the bug I just found:
// Projections.js
Projections.unitList = function(state) {
  // First, create a list from the `units` map
  // ...

  // Next, sort by the appropriate attribute
  // ...

  // Finally, add the selectable and removable flags
  var resourcesRemaining = this.resourcesRemaining(state);
  var goldRemaining = resourcesRemaining.getIn([0, 'quantity']);
  var supplyRemaining = resourcesRemaining.getIn([1, 'quantity']);
  result = result.map(function(unit) {
    return unit.merge({
      isSelectable: goldRemaining >= unit.get('cost') &&
                    supplyRemaining >= 1,
      isRemovable: unit.get('count') > 0
    });
  });

  return result;
};
// test.js
describe('Projections.unitList', function() {
it('sets isSelectable flag to false if not enough supply', function() {
var state = Immutable.fromJS({
resources: {gold: 10, supply: 0},
units: {
archer: {cost: 3, count: 2}
}
});
var unitList = Projections.unitList(state);
expect(unitList.getIn([0, 'isSelectable'])).to.be.false;
});
});// UnitList.jsx (simplified)
var UnitList = React.createClass({
render: function() {
return (
<div>
{app.projections.unitList().map(this.renderUnit).toArray()}
</div>
);
},
renderUnit: function(unit) {
return (
<p key={unit.get('id')}>
<strong>{unit.get('name')}</strong>
{' (' + unit.get('count') + ') '}
<button
onClick={app.actions.select.bind(null, unit.get('id'))}
style={{opacity: unit.get('isSelectable') ? 1 : 0}}>
{'+'}
</button>
{' '}
<button
onClick={app.actions.remove.bind(null, unit.get('id'))}
style={{opacity: unit.get('isRemovable') ? 1 : 0}}>
{'-'}
</button>
</p>
);
}
});Much better! Now my UnitList component is truly thin, and only maps the data from my app state projection to the DOM.
The same guideline applies to other components. For instance, I could create the ArmySummary component directly from the units map in the app state, sorting the units inside the component's render() method. But what if I want to change the logic and always sort by unit name, or unit count? It might be a better idea to create Projections.armySummary(state), and have the sorting and any other logic happen there, where it's easily testable, and re-usable by future components.
When we're done with the other components, we already have a fully-functional (albeit ugly) app. We can even start giving it to very early adopters (probably internally), to test the interactions, hook it up to other parts of the system (ex: a backend), etc.
The last step is adding the CSS (pardon my poor designer skills), tweaking the components to output the necessary DOM elements with correct class names, and voilà!
You can find a running version of the app here.
Using a different rendering engine
As I mentioned earlier, one advantage of having most (if not all) of the "brains" of our app contained in these functions operating on plain data is that we are not particularly tied to any DOM/UI framework or library. We can actually switch React for a different "rendering engine".
To demonstrate this point, let's re-implement the whole rendering portion of the app using D3.js. "Wait, what? I thought D3.js was for creating cool SVG charts?" Well, that's true, but D3.js handles plain HTML just fine. In fact, "d3" actually stands for "data-driven documents", which fits well with the "data-centric" approach we followed here. D3.js is also different enough from React to make it interesting to re-implement the app with. But it's also similar in the way that it follows the "given this data describe what the DOM should look like" principle, also optimizing re-renders with its "enter, update, exit selections" (React uses a "virtual DOM"). Granted, using D3.js for the whole app is a little abusive and not really something I'd recommended, but we're only trying to illustrate a point.
We'll use a single function render() called every time the app state changes:
// engine.js
var el;

function create(element) {
  el = element;
  app.addChangeListener(render);
}

function destroy() {
  app.removeChangeListener(render);
}

function render() {
  var selection = d3.select(el);
  renderGame(selection);
  renderUnitList(selection.select('.js-UnitList'));
  // ...
}
Let's look at the D3.js equivalent of the UnitList React component seen earlier:
// unitList.js (simplified)
function renderUnitList(selection) {
  var data = app.projections.unitList().toJS();

  // Data join
  var unit = selection.selectAll('.unit')
    .data(data, function(d) { return d.id; })
    .order();

  // Enter
  var enter = unit.enter().append('p').attr('class', 'unit');
  enter.append('strong').text(function(d) { return d.name; });
  enter.append('span').attr('class', 'count');
  enter.append('button')
    .attr('class', 'select')
    .text('+')
    .on('click', function(d) { app.actions.select(d.id); });
  enter.append('span').text(' ');
  enter.append('button')
    .attr('class', 'remove')
    .text('-')
    .on('click', function(d) { app.actions.remove(d.id); });

  // Enter + Update
  unit.select('.count')
    .text(function(d) { return '(' + d.count + ')'; });
  unit.select('.select')
    .style('opacity', function(d) { return d.isSelectable ? 1 : 0; });
  unit.select('.remove')
    .style('opacity', function(d) { return d.isRemovable ? 1 : 0; });

  // Exit
  unit.exit().remove();
}
Notice that, like the React component, this D3.js code is simply a mapping of the app.projections.unitList() data to DOM elements and attributes, and some wiring to hook up app.actions.select(unit) and app.actions.remove(unit) to DOM events. The rendering function stays simple and doesn't contain any other logic.
Going further
This concludes our example. By not using any framework or library (other than immutable of course) for the "data" part of the app that deals with the state logic, I hoped to keep the focus on the concepts and process of thinking about UIs in terms of data. Of course, for a "real" production app, I'd recommend using one of the proven patterns and library out there.
Flux is one of those patterns, and is very similar in its approach. You'll find the concept of "actions" again, which are data objects that will cause the state to update. This state is managed in different "stores", and it's up to you to define which stores contain "core state" and which contain "derived state" (using store dependencies, through a waitFor method). RefluxJS is an interesting Flux implementation with a slightly different take: stores can listen to other stores, so it has a more explicit "core state vs. projections" proposition.
Of course, our example was purposely simple, and additional things would need to be thought of in a real app. For example, where would we put the I/O (talking to a server via HTTP, changing the browser URL, persisting data in the browser's local storage, etc.)? How would we handle the asynchronous nature of web apps (ex: responses coming back from an HTTP request)? Could we sometimes perform some validations in order to prevent the app from getting in a "bad state"? Maybe we would need a "commands" layer between user interactions and the "actions" that change the app state, but that might mean adding a "queue" for the actions to make sure each command handler sees the most up-to-date state before deciding what to do. Also, we recalculate "projections" every time we render, which could be expensive if they require a lot of computation. Maybe we'll need to wrap them in some stateful object, and only recalculate them when the part of the state they use has changed.
Conclusion
To sum up, we built an small app by thinking of the UI as something that can be completely described by a piece of data called the application state. Interacting with the app means taking the current state and returning a new one. We used pure functions to implement all our application logic, and saw some advantages of this approach in testing, reasoning about the application, and not being tied to a particular rendering engine.
As a reminder, the full code for the example app is available on GitHub, as well as a running version of the app.