Prototyping and data modeling in the browser using TypeScript
In this article, we'll go through a full example of rapid prototyping and data modeling in the browser using TypeScript, React, and Redux, to support the technical design of a feature.
A few months ago, my team was working on a large new feature for our web application. It was tricky to fit into the product, especially without introducing a lot of technical debt. We were having many data modeling conversations on how to best represent the new concepts and functionalities. I noticed we were doing a lot of hand-waving and had trouble understanding what each one of us was picturing in our minds.
I suggested we build a small throwaway prototype that could serve as more concrete material to support the discussion. Using TypeScript, we could explore how to model the new data types. Using React, we could see if the data representation we chose was easy to use in the UI. We would use real data as much as possible to test our assumptions. We would timebox the research, and not worry about re-using any of the code.
I think the experiment was successful. All of a sudden the discussions were a lot more precise and efficient. We could point at a particular data type or UI component, and make a comment or suggest an alternative solution. The time invested in writing this throwaway code was paid off by requiring fewer meetings and making better decisions.
In this article, I'll use a made-up feature as an example. But I'll leverage the same tools we used in our actual prototype. Of course, there are other ways to create prototypes. But if you like this setup, reusing it could save you time to focus on your specific business concerns. The full source code for the example is available on GitHub.
Why prototype in the browser?
As they say, a picture is worth a thousand words. A code snippet as well. As mentioned above, we realized we were doing a lot of hand-waving during meetings trying to explain different implementation ideas for the feature. We needed to get something down on paper, a whiteboard, or in this case, a code editor and a browser screen.
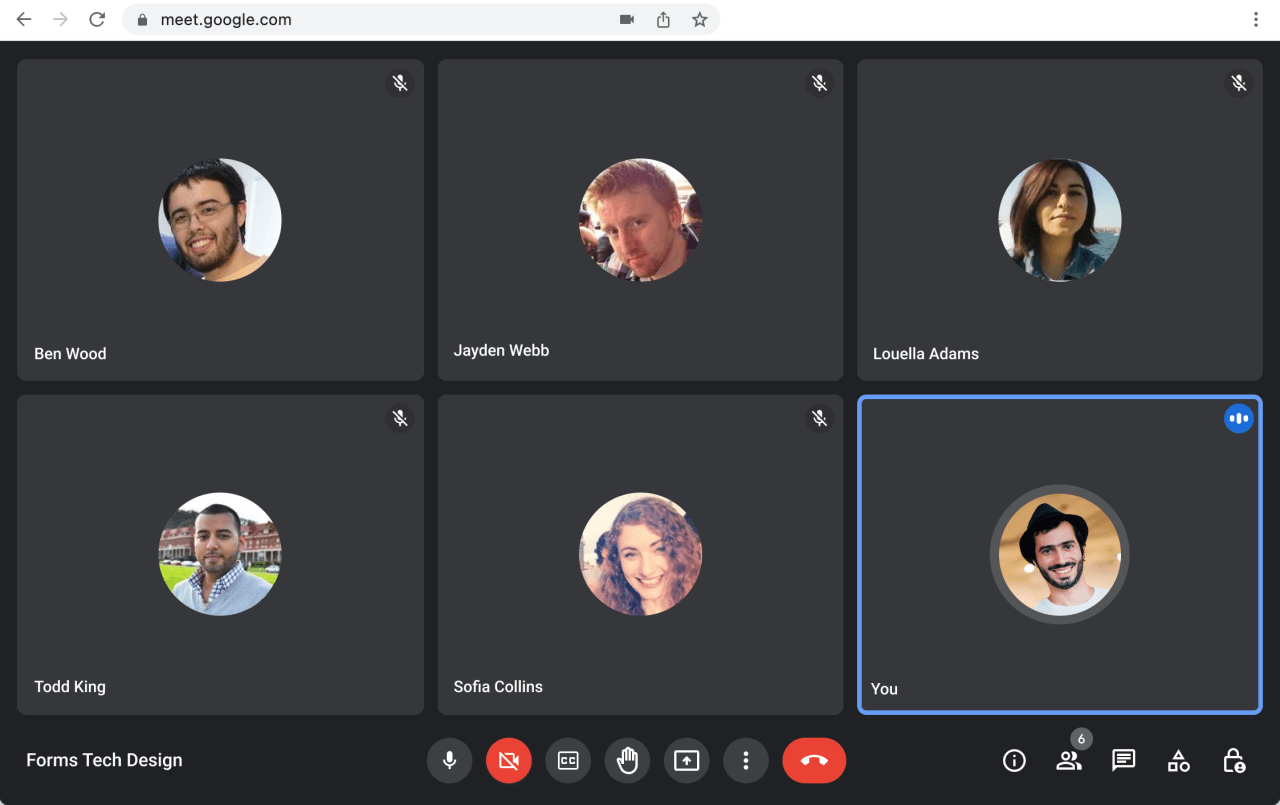
We went from staring at each other's avatars in a Google Meet to screen-sharing side-by-side data types in TypeScript and a basic rendered UI. That was a huge productivity improvement in our meetings.

The UX designers on the team used Figma a lot, which can also provide supporting material for such conversations. While it is still a very useful tool for exploring ideas and designing, I felt we didn't leverage developers enough at this stage of the project. With code and a prototype, you can show a lot of things that are hard to convey in Figmas and other static mockups.
For example, with code, you can easily work with real data and large amounts of it. Once you write a function that takes the data as input, it is then easy to switch and try different data, or a bigger data set. Realistic and non-trivial data forces you to consider edge cases: long lists, long text values, the absence of values, etc.
On the team, we already leveraged sum types (also known as "tagged union") a lot in our production code. Using code and sum types in the data modeling phase of the prototype pushes you to consider all options or branches, and easily communicate them to other developers.
A prototype in the browser also allows you to show what the URL, routing, and navigation structure could look like, an important part of the technical design for a web application.
Finally, the prototype can be useful for two different audiences: software developers as well as UX designers. The developers will probably focus more on the TypeScript types and the data modeling decisions. The UX designers can review the low-fidelity UI rendered by React. The data model and the UI are two different views of the same underlying concepts, which helps the team build a common vocabulary and work more efficiently together.
Why TypeScript?
When it comes to sketching out data types in code, for illustrative or exploratory purposes, you can use any language that has a good enough type system for your needs. For example, the backend developers on my team have used Haskell to draft technical designs, since that was the language they used in production. Other similar options would be F# for a team that works with .NET, or ReScript for a browser-based language.
I think TypeScript is a good choice for sketching out data types as a team. It is popular and many developers are familiar with its syntax, making it a good lingua franca to communicate types to both frontend and backend developers. It has a powerful type system that was well-suited for the data modeling exercise my team wanted to do. Notably, it can express sum types (or discriminated unions). It also has some more advanced features, allowing you to define types from types to avoid repetition and prototype faster.
TypeScript also has great tooling that generally works out of the box without too much setup or configuration. For instance, VS Code supports TypeScript without installing anything else, complete with type information on hover, autocomplete, etc. It also supports React's JSX syntax natively. For prototyping together as a team and screen sharing, I've found VS Code pleasant to work with. A familiar interface and smooth scrolling make it easier for people to follow along, notably compared to very personalized terminal-based text editors. We also used Live Share which worked quite well, allowing anyone to jump in and fix a type error or sketch out an alternative data type.

Finally, TypeScript works well with React and Redux, two other technologies that are well-adapted for this prototyping work. They are both popular, and have well-documented patterns (ex: Redux Toolkit), allowing us to focus on designing the technical solution to our business problem, and not reinventing the wheel. The Redux DevTools Chrome extension is also great for showing co-workers how example data is represented under the chosen data model.
The example prototype
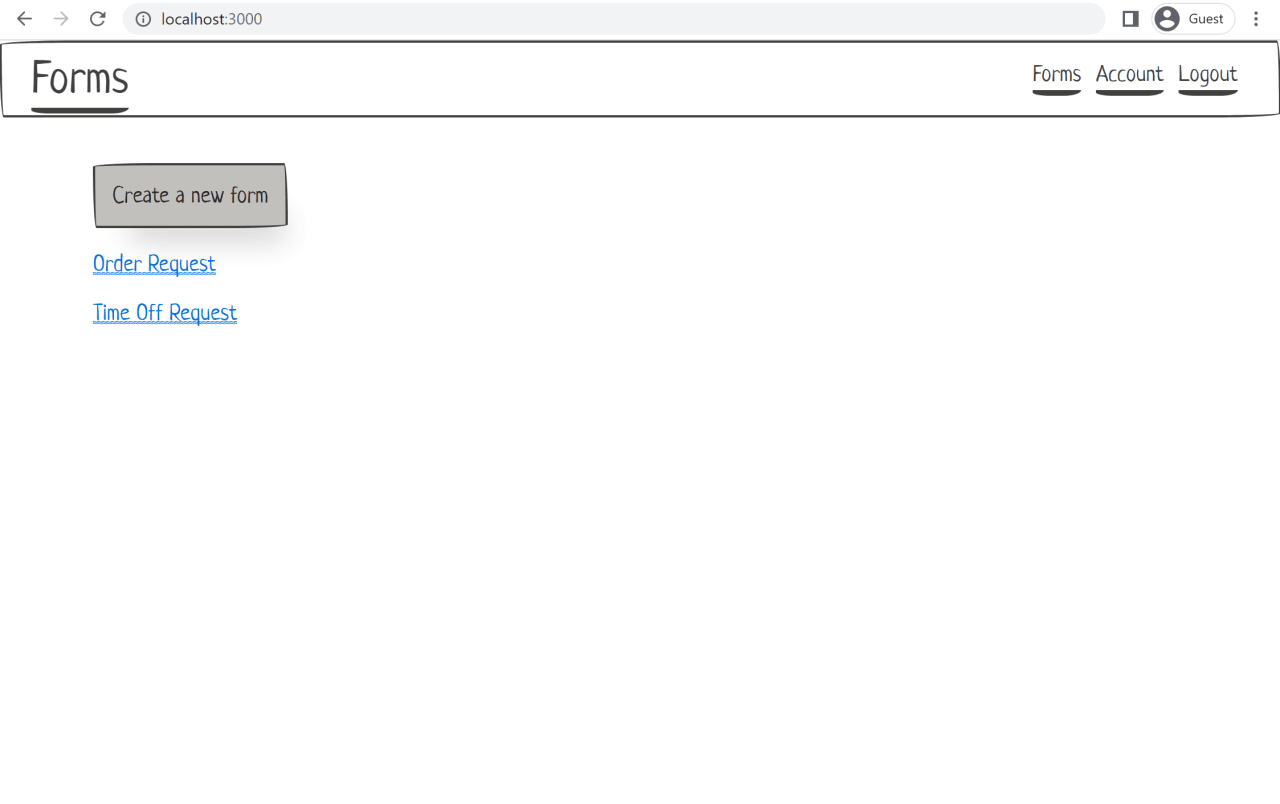
To illustrate this workflow of prototyping in the browser, we're going to pretend that we are building an application that allows the user to create online forms or surveys and collect responses. Something very similar to Google Forms.
Let's imagine that before starting to implement the production-ready version of the feature, we'd like to brainstorm with the team of developers on how to represent, persist, and render the different concepts related to this project. Concepts such as forms, questions, responses, statistics, etc. We'll also want to discuss them with the team of designers, establish a common vocabulary, and map out the different cases the code will need to account for. Building a quick, throwaway prototype during this technical design phase will prove very useful.
With the "online forms creator" example, I tried to pick something less trivial than the popular "to-do list", but small enough to be digestible in this article. The actual feature my team worked on had a lot more complexity and options when it came to the data model, which made the prototyping work even more valuable. It also leveraged sum types, in a similar way that the example in this article will use them to represent different question types. The feature my team worked on had even more branching, with multiple levels of nested sum types, making a strong type system even more helpful.
Of course, there are multiple ways to implement a Google Forms clone, and the way presented here is only one of them. Also, some of the data modeling decisions in this article were made specifically to illustrate a concept. They might have been different decisions in a real business setting.
Below is a screenshot of what the final prototype will look like.
Project setup
In this section, we'll set up everything we need before working on the prototype: tooling, dependencies, folder structure, etc.
This is typically the part where one can waste a lot of time. The JavaScript and npm ecosystems have the reputation to provide many choices and configuration options. For a production project maintained over many years, that setup time is easily offset. But for a throwaway prototype, it is even more important to start the actual work quickly.
For this reason, I'll give a detailed step-by-step guide of the specific project setup I used. If you want to adopt this setup, you'll be able to follow along and get started more quickly. Of course, this is only one of many ways to do it, so if you have a favorite project setup you are used to, feel free to use that. Just don't spend too much time on it!
The following instructions will work on any Unix system (macOS, Linux) or WSL on Windows.
We'll install Node using nvm. Copy the curl command from the installation instructions and run it. Then install the latest version of Node with:
nvm install node
nvm use node
For the frontend tooling, I chose Vite mainly because it promises a quick recompile and feedback loop. Webpack is also fine and a popular option.
We'll use the create-vite tool to scaffold the project (create-react-app is also an option if not using Vite). Don't create a project folder yet, the tool will do it for you. Run:
npm create vite@latestChoose react as a framework and react-ts as a variant.
Navigate into the new project directory and install dependencies:
npm installCheck the Node version you are using and create an .nvmrc file (replace "18" with the version you are using):
node --version
echo "18" > .nvmrc
You'll see an initial project structure similar to this:
tree -L 2 -a -I "node_modules|.git|dist" --dirsfirst --noreport
.
├── src
│   ├── App.css
│   ├── App.tsx
│   ├── favicon.svg
│   ├── index.css
│   ├── logo.svg
│   ├── main.tsx
│   └── vite-env.d.ts
├── .gitignore
├── .nvmrc
├── index.html
├── package-lock.json
├── package.json
├── tsconfig.json
├── tsconfig.node.json
└── vite.config.ts
At this point we can create the first commit:
git init
git add .
git status
git commit -m "Initial commit"
Try running the app:
npm run devInstall Visual Studio Code, and open the project folder with:
code .The editor will automatically type-check .ts and .tsx files as you edit them. Let's also add a command-line script to type-check the whole project (which is useful to run before committing, for example). In the scripts section of package.json, add the command "typecheck": "tsc --noEmit". Now run:
npm run typecheckWe'll install the Prettier code formatter. This way we won't be tempted to waste time manually formatting our code and be able to focus on the prototyping work.
npm install --save-dev prettierCreate a .prettierrc.json file with the following content:
{
  "semi": false,
  "singleQuote": true
}Note: Prettier is meant to be used without any customization. Here, we're just tweaking it to match the preferred style of Vite's scaffolding.
In VS Code, search for the Prettier extension and install it. Open the Settings with Cmd + , (Ctrl + , on Windows), search for "format on save", and enable it for the User (or for the Workspace if you prefer).
Now open a TypeScript file in VS Code such as src/App.tsx. Open the Command Palette with Cmd + Shift + p (Ctrl + Shift + p on Windows), search for "format document", and run it. You may need to select a formatter the first time you do this. You should see no changes to the file if it is already formatted properly.
In the scripts section of package.json, add the command "prettier": "prettier src --write". Now run:
npm run prettierAt the time of writing, Vite does not display the compiler type errors directly in the browser. This would be a nice development feature that could help with our prototyping productivity. We can add it using the vite-plugin-checker:
npm install --save-dev vite-plugin-checkerAdd the plugin to vite.config.ts:
import { defineConfig } from 'vite'
import react from '@vitejs/plugin-react'
import checker from 'vite-plugin-checker'

// https://vitejs.dev/config/
export default defineConfig({
  plugins: [checker({ typescript: true }), react()],
})
Try it out. Start the development server with npm run dev, then open App.tsx and create a type error. For example:
setCount((count) => count + "1")You should see the type error reported in your browser.
This concludes our initial project setup. At this point, it is a good idea to create another commit:
git add .
git commit -m "Add tooling"
Adding CSS
Our prototype doesn't have much functionality yet, but let's add some styling now. The goal will be to spend as little time as possible on the way things look. We'll want to focus on data modeling and prototyping different behaviors. This is not a high-fidelity UI mockup.
For this reason, it will be helpful to pick a CSS framework that has plenty of standard components, layout helpers, and utility classes. Picking a framework your team is already familiar with is also good, as there will be no learning curve.
For the prototype my team worked on we used Bootstrap, mainly because of its familiarity. It worked well, but one thing I realized is that the styles didn't give enough of a "low-fidelity" look. Each time I presented my screen, I felt I had to insist to the audience: "ignore the styling, this is not a UI design mockup".
I later came across some hand-drawn style CSS frameworks, such as PaperCSS and DoodleCSS. Although they have fewer components and utility classes, I think they would have been a good fit. Such a rough look would have made it immediately obvious to the audience that this is more of an interactive wireframe than a high-fidelity design. It reminds me of the "fat marker sketches" concept from Basecamp's Shape Up book.
We'll use PaperCSS in this example, but again feel free to pick whatever makes you most productive:
npm install --save papercssLet's first clean up the scaffolding created by Vite:
- Change the
<title>inindex.htmlto "Prototype" or something else - Remove the favicon link
<link rel="icon" />inindex.html - Remove files we're not going to use:
rm src/favicon.svg src/logo.svg src/App.css
Now update src/App.tsx with some basic layout helpers from PaperCSS:
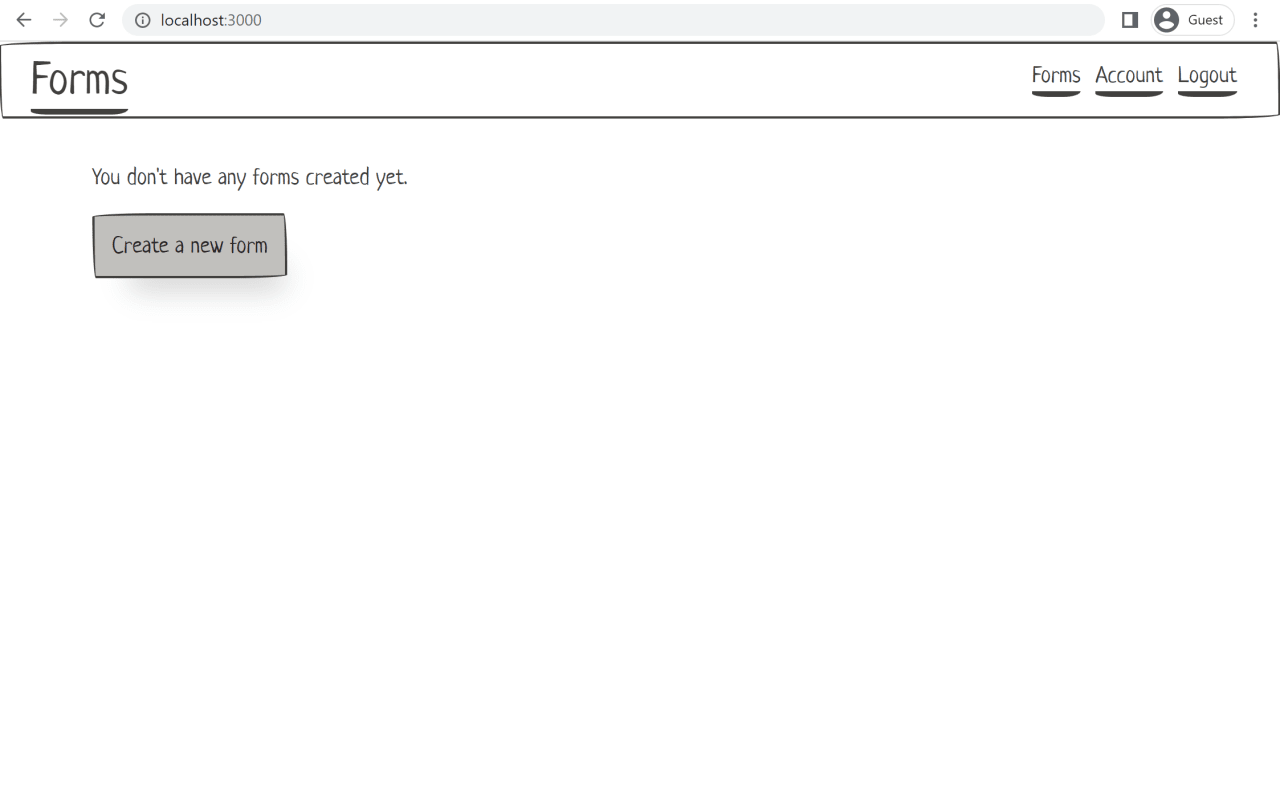
function App() {
  return (
    <div className="container margin-top-large">
      <p>You don't have any forms created yet.</p>
      <p>
        <a href="#" className="paper-btn btn-primary">
          {'Create a new form'}
        </a>
      </p>
    </div>
  )
}

export default App
In src/main.ts, import the PaperCSS styles:
import 'papercss'The first component we'll add is a Navbar. Almost every app has one. Our prototype doesn't strictly need it, especially if it is focused on a single feature, but it will help put the other elements into context.
Create a new file src/Navbar.tsx containing:
function Navbar() {
  return (
    <nav className="border split-nav">
      <div className="nav-brand">
        <h3>
          <a href="#">Forms</a>
        </h3>
      </div>
      <div className="collapsible">
        <input id="collapsible1" type="checkbox" name="collapsible1" />
        <label htmlFor="collapsible1">
          <div className="bar1" />
          <div className="bar2" />
          <div className="bar3" />
        </label>
        <div className="collapsible-body">
          <ul className="inline">
		  			<li>
              <a href="#">Forms</a>
            </li>
            <li>
              <a href="#">Account</a>
            </li>
            <li>
              <a href="#">Logout</a>
            </li>
          </ul>
        </div>
      </div>
    </nav>
  )
}

export default NavbarNote: An HTML to JSX tool becomes handy when copying examples from a CSS framework's documentation site and converting them to React components.
Import the Navbar component into src/App.tsx and add it above the container div.
Open the src/index.css file, and remove all initial styles generated by Vite's scaffolding tool.
We'll add a couple of fixes and overrides to the PaperCSS styles. Try to limit these custom CSS rules as much as possible. Again, this prototyping work is not a UI design exercise.
/* PaperCSS fixes
-------------------------------------------------------- */

a:visited {
  color: var(--secondary);
}

nav a:visited {
  color: var(--primary);
}

/* PaperCSS tweaks
-------------------------------------------------------- */

nav ul.inline li a {
  font-size: 1rem;
}

nav.subnav ul.inline {
  margin-top: 0;
}
We'll also add a couple of utility classes that we'll use later:
/* Utility classes
-------------------------------------------------------- */

.text-small {
  font-size: 0.8rem;
}

.inline-block {
  display: inline-block !important;
}

.text-right {
  text-align: right;
}
Start the server with npm run dev, and open the app in your browser to see what we have so far.
Now is a good time to commit:
git add .
git commit -m "Add PaperCSS"
Using real data
I can't stress enough the importance of working with real data as much as possible when designing a new feature or application. In my team's case, we used anonymized production data. We had to write a script that re-shaped the raw data to make it fit the new feature's data model. It may seem like a lot of work compared to creating "dummy" data, but in my experience, it is always worth the investment.
Even if you need to make up data, make it as realistic as possible. Don't use words like "test", "foo", or dog breeds (unless you're creating an application about dogs of course). Try to use real business domain terms. For example, in this article's prototype, we'll create an "Order Request" form, a "Customer Feedback" form, etc. These are forms that a company using the feature would realistically create.
By using real data, you'll notice things that you would miss with trivial and fake data. For example, you'll see that the distribution of items per category is often messier than what is shown in high-fidelity designs. It could contain a long tail of categories with just 1 or 2 items, which might not fit cleanly in a horizontal list of filters for instance. You'll see that the length of a text field, such as the name of an item or person, can sometimes be very short or very long. The UI will need to account for that, by wrapping the text or by using an ellipsis with a tooltip.
The ability to work with real data, and large amounts of it, is one of the big differentiators of a prototype in code compared to static designs such as those created in Figma. You can write a single rendering function, then .map() over hundreds of items and see what the result looks like, what patterns arise, and all the cases that need to be handled. As you iterate and get feedback, a change to that rendering function will apply to all of the items in the sample data set. Whether there are a couple of items or a hundred items, it is the same amount of work.
For the online forms prototype in this article, I did not use real data since it is just an example. But if it were real prototyping work, I imagine we would take the time to gather a couple of actual forms and their responses that customers are using as part of their business processes.
Once you have obtained a real data set, how do you use it in the prototype? Unless the data set is very large, a flat-file format checked in the repository gives you some persistence without complicating the prototype's stack by introducing a dependency on PostgreSQL or similar.
If you use a serialized format like JSON or YAML instead of creating the sample data directly in code with TypeScript, then it will force you to think about how the data will be serialized and persisted. This is an important part of a feature's technical design. To give an example, in my team's prototyping work, one approach we first took had functions attached to each record of the chosen data structure. We quickly realized that we wouldn't be able to persist these functions or send them to the frontend, and that we needed to find a way to represent them as data or change our approach.
We'll install vite-plugin-content, which allows us to import directly many text formats such as yaml or csv. Bundlers like Vite or Webpack support json out of the box, but it is not always the easiest to work with. In my team's project, we already had a lot of data in YAML format. It was also slightly easier to write YAML by hand compared to JSON. In this example, we'll use YAML for forms and questions, and CSV for responses.
Install the plugin with:
npm install --save-dev @originjs/vite-plugin-contentUpdate vite.config.ts to load the plugin:
// ...
import content from '@originjs/vite-plugin-content'

export default defineConfig({
  plugins: [checker({ typescript: true }), content(), react()],
})
Create a src/data/ directory where we'll put all of our .yaml and .csv sample data files. Also create a src/data.ts file that we'll use to load the data and annotate it with proper types.
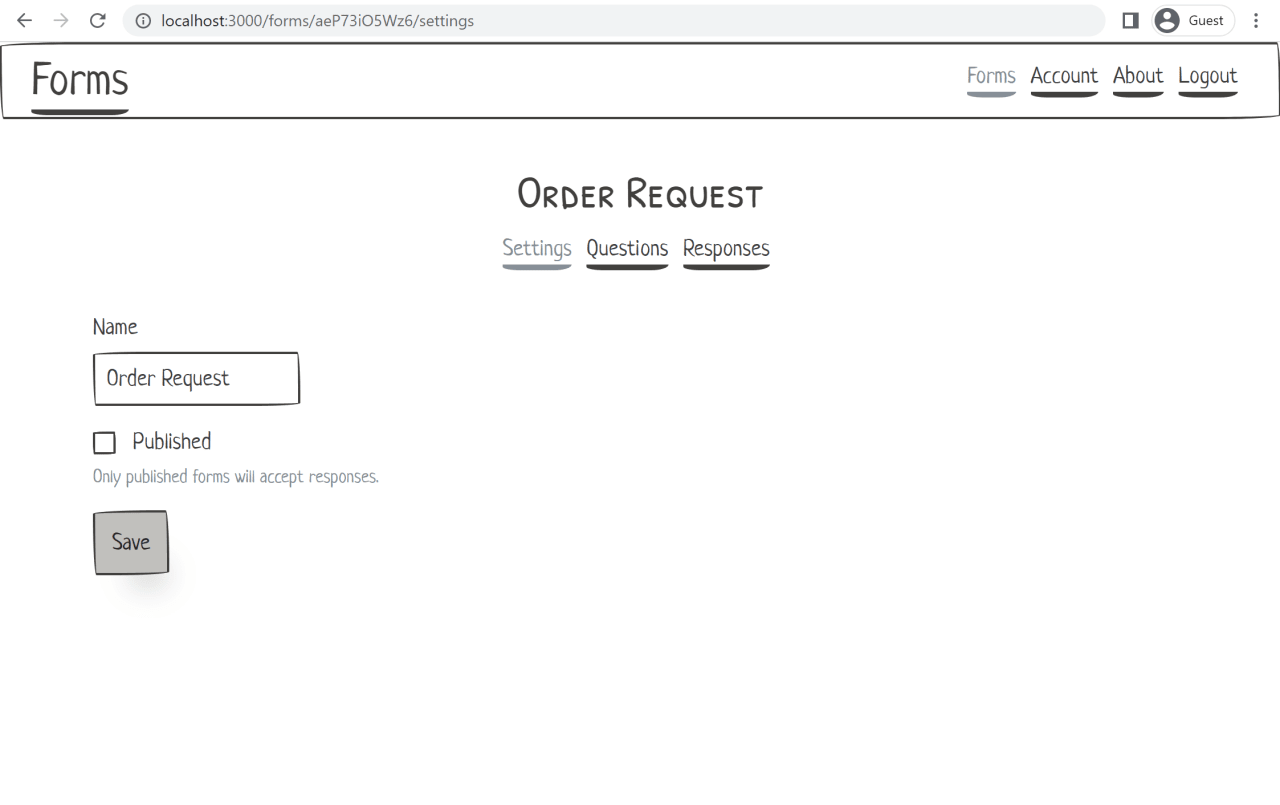
Let's test the setup by adding a basic form object, with just an id, a name, and a published flag. Create form.ts in the src/ directory, with the following data type declaration:
export type FormId = string

export type Form = {
  id: FormId
  name: string
  published: boolean
}
Now create a few sample data files: data/order-request.yaml, data/work-request.yaml, data/customer-feedback.yaml. They should look like this:
id: aeP73iO5Wz6
name: Order Request
published: true
As a side note, when manually creating new sample data, you often need to generate unique IDs. I recommend making these IDs realistic (i.e. not "123"). An Online UUID Generator is useful if that is the format you are using. In this example, we're using Nano ID with a custom format. After installing it with npm install --save nanoid, I added a script to package.json to make it easier to generate new IDs:
{
  "nanoid": "nanoid --alphabet 0123456789ABCDEFGHIJKLMNOPQRSTUVWXYZabcdefghijklmnopqrstuvwxyz --size 11"
}
I can then use the script by running:
npm run nanoidBack to our sample data files, we can import them directly in data.ts thanks to the Vite plugin, and re-export them with proper type annotations:
import { FormId, Form } from './form'

import customerFeedback from './data/customer-feedback.yaml'
import orderRequest from './data/order-request.yaml'
import timeOffRequest from './data/time-off-request.yaml'

export const formsData: { [key: FormId]: Form } = {
  [customerFeedback.id]: customerFeedback,
  [orderRequest.id]: orderRequest,
  [timeOffRequest.id]: timeOffRequest,
}
If you try it now you should get an error similar to:
Cannot find module './data/customer-feedback.yaml' or its corresponding type declarations.ts(2307)We can fix that by adding a type declaration for .yaml files. We'll add the declaration, as well as one for .csv files, to the existing vite-env.d.ts file:
// Other file types that TypeScript can't resolve module for

declare module '*.yaml' {
  const data: any
  export default data
}

declare module '*.csv' {
  const data: any
  export default data
}
Let's render the sample data we have so far. Create a new FormList.tsx component:
import { Form } from './form'

function FormList(props: { forms: Array<Form> }) {
  return (
    <>
      {props.forms.map((form) => (
        <p>
          <a href={`#${form.id}`}>{form.name}</a>
        </p>
      ))}
    </>
  )
}

export default FormList
Finally, import and use formsData and FormList inApp.tsx:
// ...
import FormList from './FormList'

import { formsData } from './data'

function App() {
  const forms = Object.values(formsData).sort((a, b) =>
    a.name.localeCompare(b.name)
  )

  return (
    <>
      <Navbar />
      <div className="container margin-top-large">
        <FormList forms={forms} />
      </div>
    </>
  )
}
You should now see a basic list of forms in the browser:
Adding routes with React Router
Next, we'll add support for routes and URL handling. You might wonder if this is strictly necessary for a prototype. It depends on what you are prototyping, but I've found that designing routes is an important part of data modeling. It forces you to think about information hierarchy, and the relationship between different data elements, notably when picking parent and child routes. What's more, having shareable and bookmarkable URLs is important for the user experience of any web application, and is often mishandled in Single-Page Apps (SPAs). Finally, URLs can't be easily conveyed in static Figma designs, making the prototype a good place to design them.
We'll use the popular React Router library. It takes some getting used to if you haven't worked with it before, but the following example hopefully covers most use-cases a prototype would need. We'll skip over some details to not repeat React Router's documentation.
As a reminder, the full source code of this example is available on GitHub.
Install the React Router library with:
npm install --save react-router-domAdd BrowserRouter to main.tsx:
root.render(
  <React.StrictMode>
    <BrowserRouter>
      <App />
    </BrowserRouter>
  </React.StrictMode>
)
Let's start splitting things up into separate React components that can be used for routing. Create a couple of placeholder "page" components:
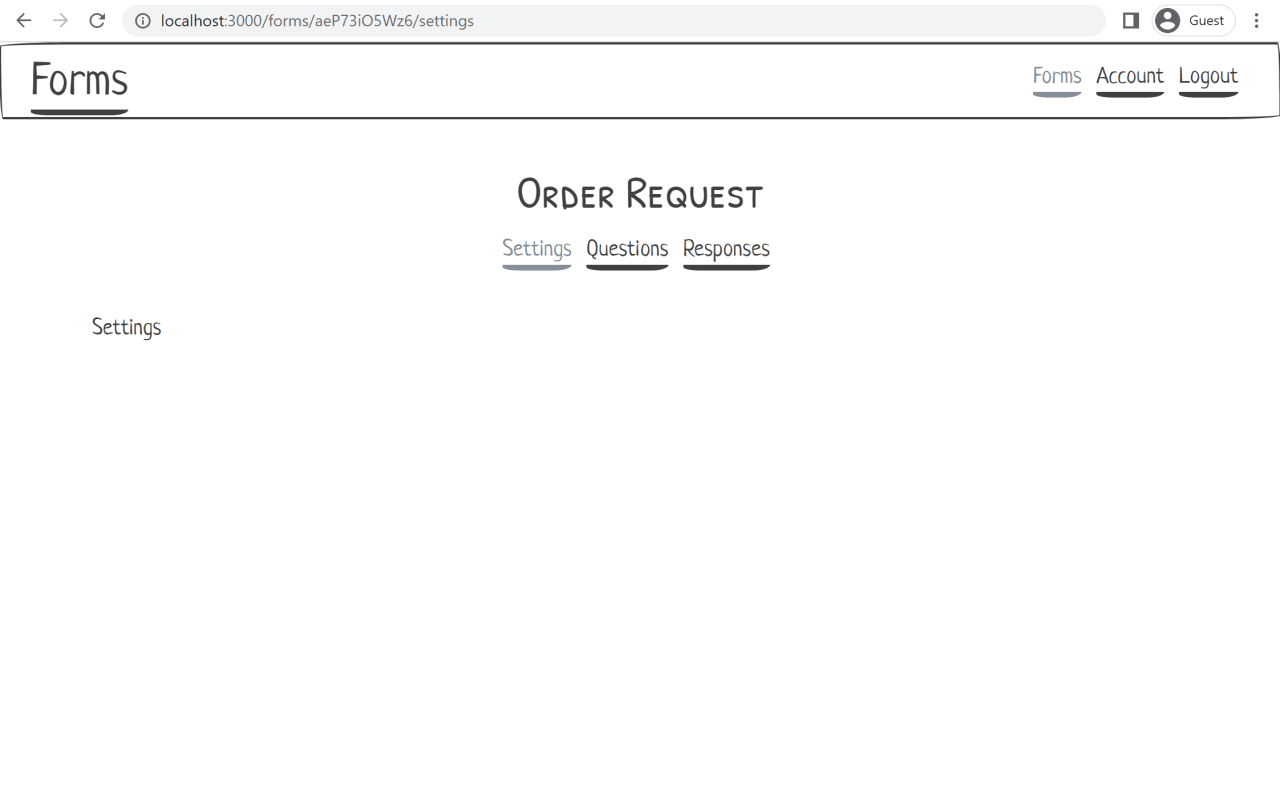
Forms.tsx(with the contents of what we had so far inApp.tsx)Account.tsx(will give us another page in the top-level navigation)FormSettings.tsx,FormQuestions.tsx,FormResponses.tsx(will be used as child routes for a specific form)
For now, just add placeholder text in each of these page components. For example:
function FormQuestions() {
  return (
    <>
      <p>Questions</p>
    </>
  )
}

export default FormQuestions
Next, let's add links to these pages in our nav components. Update Navbar.tsx to use <NavLink> instead of <a>:
<li>
  <NavLink to="forms">Forms</NavLink>
</li>
<li>
  <NavLink to="account">Account</NavLink>
</li>
Create a new FormNav.tsx component with links to Settings, Questions, and Responses:
function FormNav() {
  return (
    <>
      <nav className="row flex-center">
        <ul className="inline">
          <li>
            <NavLink to="settings">Settings</NavLink>
          </li>
          <li>
            <NavLink to="questions">Questions</NavLink>
          </li>
          <li>
            <NavLink to="responses">Responses</NavLink>
          </li>
        </ul>
      </nav>
    </>
  )
}
The NavLink component from React Router will add an .active CSS class to links that represent the current route. If the CSS framework you are using doesn't already have a rule for it, make sure to add one to index.css:
/* React Router
-------------------------------------------------------- */

nav a.active {
  color: var(--muted);
  border-bottom-color: var(--muted);
}
Now, let's create a couple of "layout" components that will leverage React Router's Outlet to render child routes with the same layout structure. We'll add these directly to App.tsx since that's the only place they will be used.
Add a component Layout to App.tsx with the same contents we previously had in the App component but replace the contents of <div class="container"> with <Outlet>:
function Layout() {
  return (
    <>
      <Navbar />
      <div className="container margin-top-large margin-bottom-large">
        <Outlet />
      </div>
    </>
  )
}
Also add a FormLayout component to App.tsx using the new FormNav we created:
function FormLayout() {
  return (
    <>
      <FormNav />
      <div className="margin-top-large margin-bottom-large">
        <Outlet />
      </div>
    </>
  )
}
Now that we have all the building blocks, we can create our Routes component hierarchy. We'll use the App component for that:
function App() {
  return (
    <Routes>
      <Route path="/" element={<Layout />}>
        <Route index element={<Navigate to="forms" replace />} />
        <Route path="forms">
          <Route index element={<Forms />} />
          <Route path=":formId" element={<FormLayout />}>
            <Route index element={<Navigate to="settings" replace />} />
            <Route path="settings" element={<FormSettings />} />
            <Route path="questions" element={<FormQuestions />} />
            <Route path="responses" element={<FormResponses />} />
          </Route>
        </Route>
        <Route path="account" element={<Account />} />
      </Route>
    </Routes>
  )
}
A few things to note here:
- We're using our "layout" components
LayoutandFormLayoutin the wrapper routes/and/forms/:formId - We use the
indexattribute to render the forms list for the route/forms - We use the
<Navigate to="..." replace />component to redirect/to/forms, and to redirect/forms/:formIdto/forms/:formId/settings
Let's update the remaining <a> elements to <Link> in FormsList.tsx:
<p key={form.id}>
  <Link to={form.id}>{form.name}</Link>
</p>
Note the relative link to={form.id} instead of to={'/forms/' + form.id}, which would potentially allow us to re-use this component elsewhere in the route hierarchy.
For links, as a rule of thumb use <Link> unless you need the .active class automatically added (usually for navbars). In that case, use <NavLink>.
To access URL params, such as the form ID in /forms/formId, we use React Router's useParams() hook. We can do this in a relatively type-safe way by declaring the type Params that we expect and using type casting. Do this in FormNav.tsx to find the form in the data store and display its name:
import { NavLink, useParams } from 'react-router-dom'
import { formsData } from './data'
import { FormId } from './form'

type Params = {
  formId: FormId
}

function FormNav() {
  const params = useParams() as Params
  const form = formsData[params.formId]

  return (
    <>
      <h3 className="row flex-center margin-none">{form.name}</h3>
      <nav className="row flex-center">
        {/* ... */}
      </nav>
    </>
  )
}
You can now run the app and test out the new navigation and routes.
Managing data with Redux
For the prototyping work, Redux works as an in-memory database. It allows us to persist in memory the changes from UI interactions we want to demonstrate. Redux selectors also give us a framework to query data and make it available to React components.
With Redux, we can emulate data persistence without having to introduce a SQL database, fetching data over HTTP, handling loading and failure states, keeping the local in-memory store in sync, etc.
Redux is also popular and has been around for a while. It has developed a set of best practices giving us a well-documented framework to manage data. This means we don't need to reinvent the wheel and can focus on prototyping and the technical design of our feature.
These best practices have been packaged in a library, Redux Toolkit, which we'll be using here. Install it, along with react-redux, by running:
npm install --save @reduxjs/toolkit react-reduxNote: For a good video introduction to Redux Toolkit, see Let’s Learn Modern Redux! (with Mark Erikson).
Before we begin using Redux, let's talk about file organization. You'll see recommendations in the documentation to split up your business logic into different folders, for example src/user/ and src/forms/. However, I recommend keeping everything under the top-level src/ folder for a quick prototype. This way you don't over-think file organization and focus on the important things. And if you really do have a lot of files, maybe what you need is two different prototypes.
Follow the instructions to configure Redux Toolkit for TypeScript. As mentioned above, we won't nest the files under a src/app/ directory. We'll create top-level files, src/store.ts and src/hooks.ts.
Once that is done, follow the steps to provide the store to React in main.ts.
Next, we'll create a new formsSlice.ts by following the instructions to create a slice with TypeScript. We'll set the initial state to be the YAML files that we loaded into formsData earlier. The result should look like this:
import { createSlice } from '@reduxjs/toolkit'
import { RootState } from './store'
import { formsData } from './data'
import { Form, FormId } from './form'

type FormsState = { [key: FormId]: Form }

const initialState: FormsState = formsData

export const formsSlice = createSlice({
  name: 'forms',
  initialState,
  reducers: {},
})

export const formsReducer = formsSlice.reducer
Import formsReducer into store.ts:
// ...
import { formsReducer } from './formsSlice'

export const store = configureStore({
  reducer: {
    forms: formsReducer,
  },
})
Back in formsSlice.ts, let's add a couple of first selectors:
export const selectFormById = (state: RootState, id: FormId): Form => {
  const result = state.forms[id]
  if (!result) {
    throw new Error(`Expected to find form with id ${id}`)
  }
  return result
}

export const selectAllFormsSortByName = (state: RootState): Array<Form> => {
  return Object.values(state.forms).sort((a, b) => a.name.localeCompare(b.name))
}
Note that all selectors accept RootState as the first argument.
Also note that in selectFormById, we throw an error if the lookup returns undefined. This is a prototype, so we want to focus on the happy path and temporarily put aside error-handling. In a production application, we may have the selector return Form | undefined and handle the case of missing data in the UI.
Finally, we'll replace all direct usage of the formsData initial state in React components and use the Redux store instead. Using VS Code, you can open data.ts, right-click onformsData and select "Find All References". Use the useAppSelector hook from src/hooks.ts as well as the selectors we defined in formsSlice.ts.
For example, in Forms.tsx:
// ...
import { selectAllFormsSortByName } from './formsSlice'
import { useAppSelector } from './hooks'

function Forms() {
  const forms = useAppSelector(selectAllFormsSortByName)
  // ...
}
And in FormNav.tsx:
// ...
import { selectFormById } from './formsSlice'
import { useAppSelector } from './hooks'

function FormNav() {
  const params = useParams() as Params
  const form = useAppSelector((state) => selectFormById(state, params.formId))
  // ...
}
If you flip back to the browser, the forms list should still render properly as before. And clicking on a form should still display its name in the top section.
Basic CRUD
In this next part, we'll add some basic CRUD behavior to our prototype. We already have some "Read" functionality from the previous section that displays a list of forms. We'll add "Create" and "Update" for forms, as well as "Update" for the user account. We'll skip "Delete" for this prototype.
For this prototype, the CRUD functionality may not be the most interesting part of the technical design. But it will be an opportunity to get familiar, if you aren't already, with Redux and Redux Toolkit. Other prototyping work might have more sophisticated Add/Remove behavior to showcase, and familiarity with the tools will help get a demo ready faster.
In formsSlice.ts, add a new reducer called formAdded with the following definition. Remember to export it so we can use it later.
import { Form, FormId, generateFormId } from './form'
// ...

export const formsSlice = createSlice({
	// ...
  reducers: {
    formAdded: {
      reducer: (state, action: PayloadAction<{ id: FormId; name: string }>) => {
        const { id, name } = action.payload
        const form: Form = {
          id: id,
          name: name,
          published: false,
        }
        state[id] = form
      },
      prepare: (name: string) => {
        return {
          payload: {
            id: generateFormId(),
            name: name,
          },
        }
      },
    },
  },
})

// ...
export const { formAdded } = formsSlice.actions
There are a couple of things to note here. First, we're adopting the past tense naming convention by using formAdded vs. addForm. This is explained in the Redux style guide's Model Actions as Events, Not Setters section. Although picking good names is arguably less important for prototype code that will be thrown away, adopting a convention means there is one less thing we need to think about.
The second thing to note is that we are using the longer form of the reducer definition, with the reducer and prepare attributes. It allows us to customize the generated action creator. We do so to generate a random ID for the new form in the action creator instead of the reducer, following the rule that reducers must not have side effects. The generateFormId() function here is just a wrapper around nanoid(), see form.ts for more details.
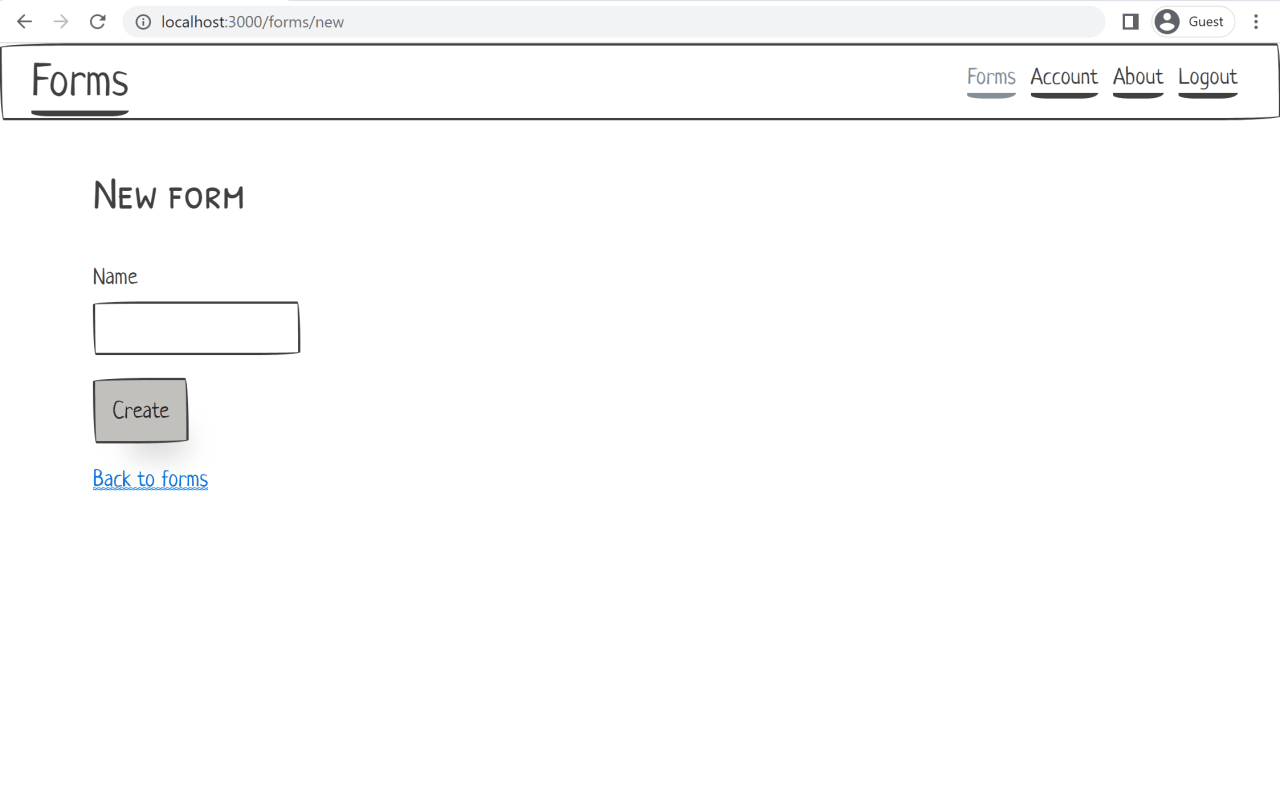
Now let's use this "form added" action. Create a new component FormCreate.tsx:
function FormCreate() {
  // ...

  return (
    <>
      <h3>New form</h3>
      <form onSubmit={handleSubmit}>
        <div className="form-group">
          <label htmlFor="name">Name</label>
          <input
            type="text"
            id="name"
            name="name"
            value={name}
            onChange={handleNameChange}
          />
        </div>
        <input type="submit" className="paper-btn btn-primary" value="Create" />
      </form>
    </>
  )
}

export default FormCreate
We will need to hook it up to the rest of the app. Add a route inApp.tsx, nested under the "forms" route:
<Route path="new" element={<FormCreate />} />In Forms.tsx, add a create button that navigates to this new route:
<p>
  <Link to="new" className="paper-btn btn-primary">
    Create a new form
  </Link>
</p>
<FormList forms={forms} />
Now back in FormCreate.tsx, let's define the component state and its change handler (name and handleNameChange), as well as the form submit handler (handleSubmit):
const dispatch = useAppDispatch()
const navigate = useNavigate()

const [name, setName] = useState('')
const handleNameChange: React.ChangeEventHandler<HTMLInputElement> = (e) =>
setName(e.target.value)

const handleSubmit: React.FormEventHandler = (e) => {
  e.preventDefault()

  const action = formAdded(name)
  dispatch(action)
  navigate(`/forms/${action.payload.id}`)
}
There are a few things to note here. First, we use the ChangeEventHander and FormEventHandler type annotations on the input change handler and form submit handler. If we didn't, e would have the inferred type any. See also the "Forms and Events" section in this React TypeScript Cheatsheet.
Second, we're dispatching the new form action with the useAppDispatch() hook defined in hooks.ts, and the formAdded action creator defined in formsSlice.ts.
And third, to redirect to the newly created form page, we retrieve the generated form ID from the action returned by formAdded. We use it to construct the route passed to the useNavigate() hook from react-router-dom.
Also notice that there are no validation errors. For example, we could leave the form name empty. This is intended. Remember that this is a prototype, so we want to focus on the happy path.
Let's finish this part by adding "Update" functionality to:
For the implementation details, see the source files linked above. It is similar to the FormCreate component, except we don't need to redirect after dispatching the update action.
We also need to add two new action creators:
formSettingsUpdatedtoformsSlice.tsaccountUpdatedtouserSlice.ts
The userSlice.ts file is new. To integrate it with the rest of the app, we need to add or update a couple of other files:
- Add
user.tswith the type definition of aUser - Add
data/user.yamlwith a sample user - Update
data.tsto exportuserDatawith proper type annotations - Update
store.tsto includeuserin the main reducer
Data modeling
We're getting to the heart of this prototyping exercise. Designing your data model, and how to represent the different concepts related to the feature, is where you'll likely spend most of your time. The reason we went into details in the previous sections was to provide a guide so you could spend less time setting up tools and libraries such as React, Redux, and React Router. But the real value of the prototyping work is in this data modeling phase.
In the case of this article's example, most of the interesting work will be the TypeScript type declarations in forms.ts. Again, this is a simple example so the data modeling will be relatively straightforward. But working this way on more complex problems has proved very useful. The solutions were refined through multiple iterations thanks to this method.
If pressed on time, one could reduce the exercise to only writing TypeScript types and some example data, skipping the prototype UI part with React. Sketching out a data model with a single code snippet is definitely better than having no supporting material to use in meetings.
However, I find that trying to display the data model in the browser helps with the technical design. I've seen APIs send back JSON data that is unnecessarily hard to work with on the frontend (we'll see an example below of missing identifiers to use as React keys for lists). Conversely, the data model sketched out in the browser prototype might not be exactly how we persist and store it in the database. We'll probably use data types and shapes that are more optimized for the backend, with a translation layer in between.
In that sense, it is useful to often flip back and forth between the abstract type definition in form.ts, the sample data in data/, and the React components in .tsx files. Continuously modeling, serializing, and rendering the data will help validate that the data model chosen is easy to work with.
Back to our example, we already have a Form data type. It has an id, a name, and a published flag. We'll add the FormQuestion data type. Each form has a list of questions. Note that the order of questions is relevant, so we use a list (and not a map or a set).
export type Form = {
  id: FormId
  name: string
  published: boolean
  questions: Array<FormQuestion>
}

export type FormQuestion = unknown
There are different types of questions in a form. To represent this, we'll leverage sum types (also known as "tagged unions" or "discriminated unions"). TypeScript doesn't have first-class support for sum types, but you can represent them with a union of object types. All of the object types in the union contain a common field that has a unique and constant value. This allows the compiler to discriminate between each branch. We'll choose to use the tag field for this purpose:
export type FormQuestion =
  | { tag: 'shortText'; question: ShortTextQuestion }
  | { tag: 'longText'; question: LongTextQuestion }
  | { tag: 'singleChoice'; question: SingleChoiceQuestion }
  | { tag: 'multipleChoice'; question: MultipleChoiceQuestion }
  | { tag: 'scale'; question: ScaleQuestion }

export type ShortTextQuestion = unknown
export type LongTextQuestion = unknown
export type SingleChoiceQuestion = unknown
export type MultipleChoiceQuestion = unknown
export type ScaleQuestion = unknown
Note that we could also include the tag attribute directly in the named data type, like so:
export type FormQuestion =
  | ShortTextQuestion
  | LongTextQuestion
  | SingleChoiceQuestion
  | MultipleChoiceQuestion
  | ScaleQuestion

export type ShortTextQuestion = {
  tag: 'shortText'
  // ...
}
export type LongTextQuestion = {
  tag: 'longText'
  // ...
}

// ...
Here we chose instead to define types (ShortTextQuestion, LongTextQuestion, etc.) that can be used independently of the sum type.
Also, keep in mind that each branch of a sum type doesn't have to have the same attributes, as long as it has the tag attribute used to discriminate. For example:
type LoadingState =
  | { tag: 'pending' }
  | { tag: 'failure'; error: AppError }
  | { tag: 'success'; data: Data; timing: number }
Let's now write out the data types corresponding to the different kinds of questions. Each question has a title and an optional description, a flag indicating if answering the question is required or not, as well as some additional attributes that depend on the question type:
export type ShortTextQuestion = {
  title: string
  description: string | null
  required: boolean
}

export type LongTextQuestion = {
  title: string
  description: string | null
  required: boolean
}

export type SingleChoiceQuestion = {
  title: string
  description: string | null
  required: boolean
  choices: Array<{
    id: ChoiceId
    value: string
  }>
}

export type MultipleChoiceQuestion = {
  title: string
  description: string | null
  required: boolean
  choices: Array<{
    id: ChoiceId
    value: string
  }>
}

export type ScaleQuestion = {
  title: string
  description: string | null
  required: boolean
  start: number
  end: number
  startLabel: string
  endLabel: string
}
As you can see, there is a lot of repetition. This can be improved by using generics and introducing a type parameter T. This type parameter will represent the attributes that are specific to each question type. If the question type has no specific attribute, we'll provide null as the concrete type for T.
We define a generic Question<T>, as well as concrete types for each kind of question (ShortText, LongText, SingleChoice, MultipleChoice, and Scale):
export type Question<T> = {
  title: string
  description: string | null
  required: boolean
  definition: T
}

export type ShortText = null

export type LongText = null

export type SingleChoice = Array<string>

export type MultipleChoice = Array<string>

export type Scale = {
  start: number
  end: number
  startLabel: string
  endLabel: string
}
Finally, let's update the sum type FormQuestion to use the new generic Question<T>:
export type FormQuestion =
  | { tag: 'shortText'; question: Question<ShortText> }
  | { tag: 'longText'; question: Question<LongText> }
  | { tag: 'singleChoice'; question: Question<SingleChoice> }
  | { tag: 'multipleChoice'; question: Question<MultipleChoice> }
  | { tag: 'scale'; question: Question<Scale> }
The next step is to try this data model by creating some sample data. We'll update the .yaml files under data/ and use the shape of the data defined above. In a real-world setting, we'll want to use realistic data as much as possible. For instance, we could've asked potential customers to share some real forms and surveys and see how those fit in our data model.
Bellow, we added some questions to data/order-request.yaml:
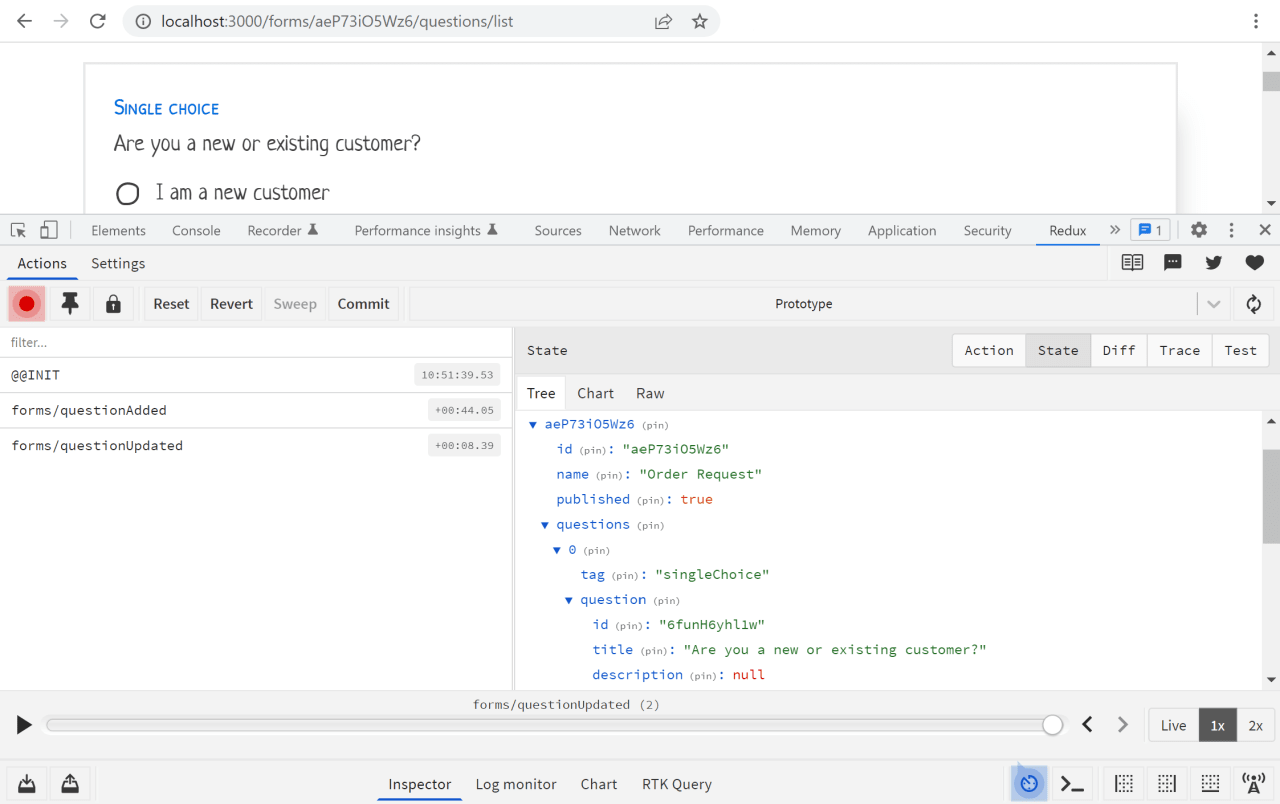
id: aeP73iO5Wz6
name: Order Request
published: true
questions:
  - tag: singleChoice
    question:
      title: Are you a new or existing customer?
      description:
      required: false
      definition:
        - I am a new customer
        - I am an existing customer
  - tag: shortText
    question:
      title: What is the item you would like to order?
      description: Please enter the product number
      required: true
      definition:
  - tag: multipleChoice
    question:
      title: What color(s) would you like to order?
      description:
      required: false
      definition:
        - Red
        - Blue
        - Green
        - Yellow
  # ...
The last step in the "model, serialize, render" loop is to take this sample data and try to render it on screen.
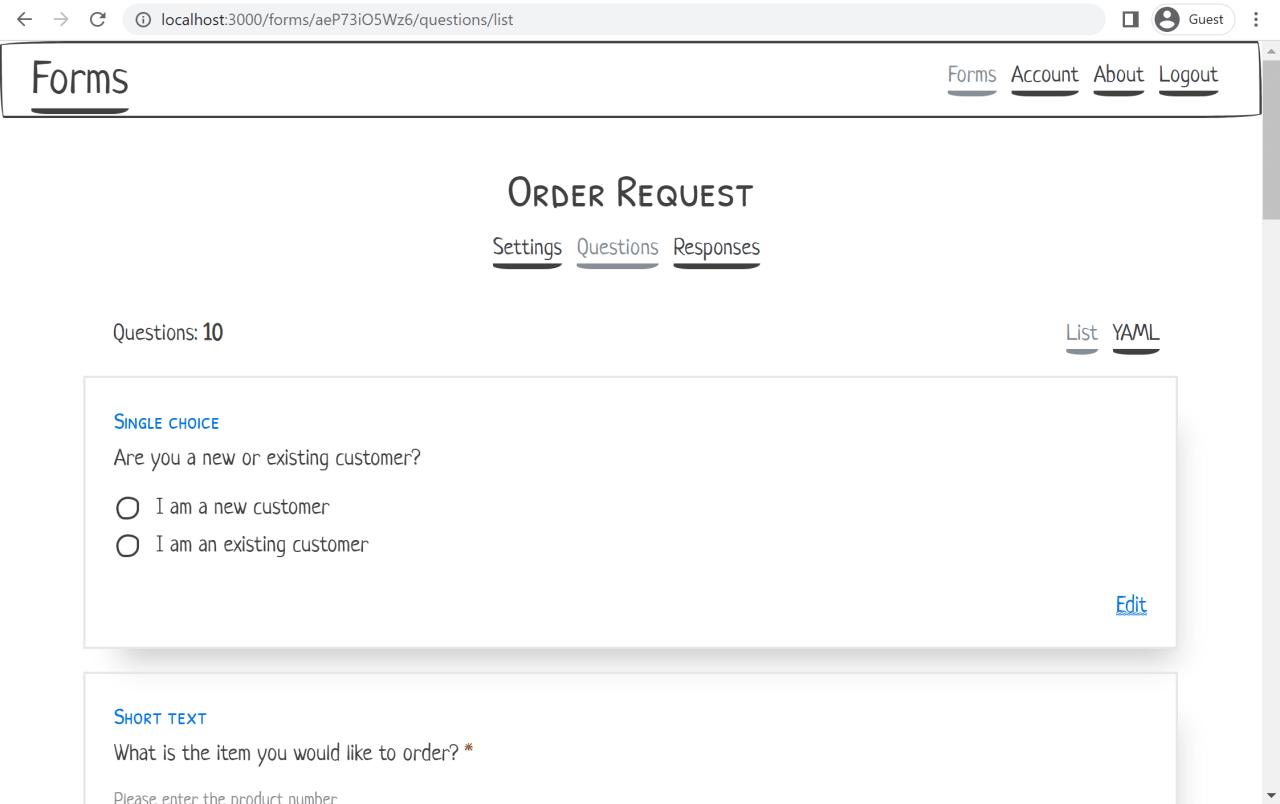
We'll update the FormQuestions React component and render the list of questions for a form. Not everything will be shown here, so refer to the full source in FormQuestions.tsx for more details.
Use React Router's useParams() hook and the selectFormById selector we created earlier to get the correct form data based on the URL. Then .map() over the list of questions to render them:
import { selectFormById } from './formsSlice'
import { useAppSelector } from './hooks'
type Params = {
formId: FormId
}
function FormQuestions() {
const params = useParams() as Params
const form = useAppSelector((state) => selectFormById(state, params.formId))
return (
<>
{form.questions.map((formQuestion) => (
<QuestionCard formQuestion={formQuestion} />
))}
</>
)
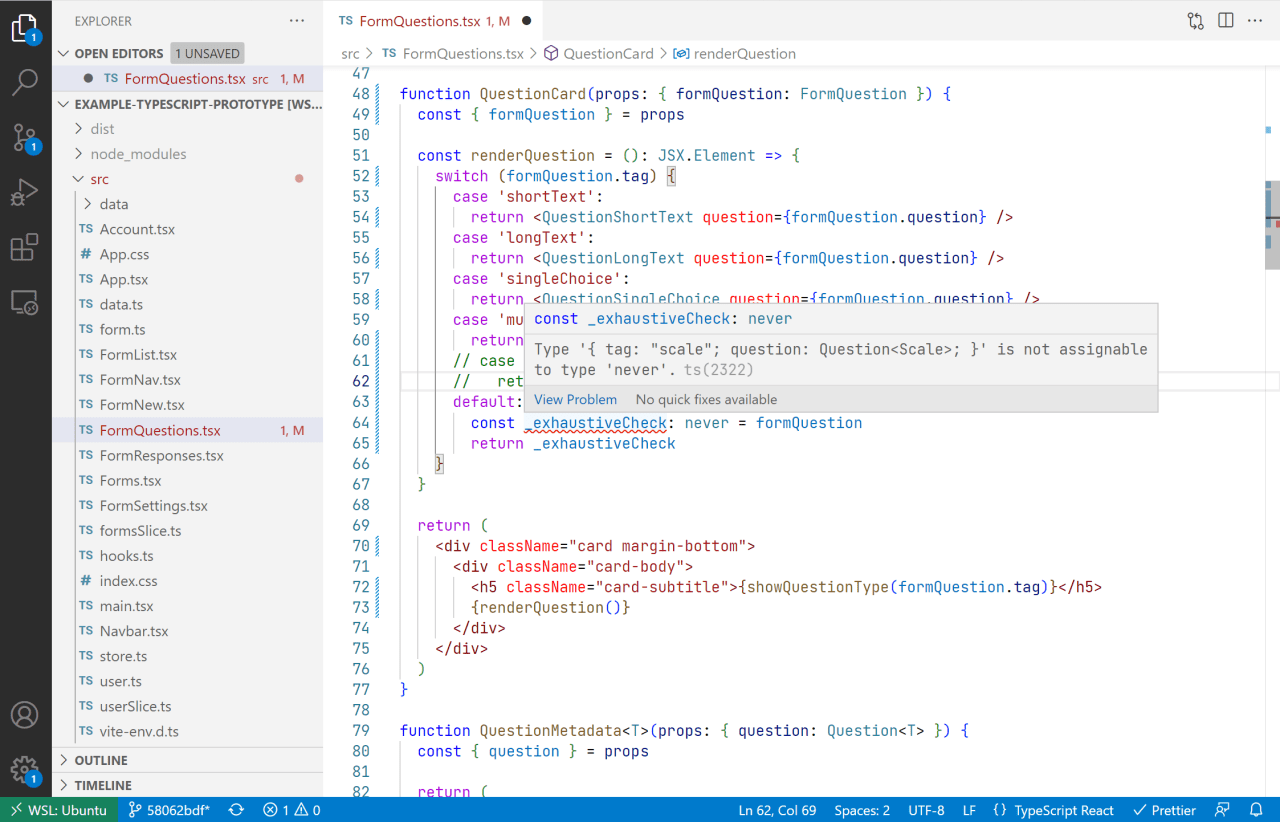
}In the QuestionCard component, we'll leverage TypeScript's exhaustiveness checking to make sure we render every question type. For this, we use a switch statement with a special default branch that assigns any case that we missed to the never type . Let's use this pattern in renderQuestion:
function QuestionCard(props: { formQuestion: FormQuestion }) {
  const { formQuestion } = props

  const renderQuestion = (): JSX.Element => {
    switch (formQuestion.tag) {
      case 'shortText':
        return <QuestionShortText question={formQuestion.question} />
      case 'longText':
        return <QuestionLongText question={formQuestion.question} />
      case 'singleChoice':
        return <QuestionSingleChoice question={formQuestion.question} />
      case 'multipleChoice':
        return <QuestionMultipleChoice question={formQuestion.question} />
      case 'scale':
        return <QuestionScale question={formQuestion.question} />
      default:
        const _exhaustiveCheck: never = formQuestion
        return _exhaustiveCheck
    }
  }

  return (
    <div className="card margin-bottom">
      <div className="card-body">
        <h5 className="card-subtitle">{showQuestionType(formQuestion.tag)}</h5>
        {renderQuestion()}
      </div>
    </div>
  )
}
Try commenting out the 'scale' case, and you'll see that the compiler raises a type error. The use of never allows us to see which cases we have missed.
To render each question type, we extract common pieces into a re-usable QuestionMetadata<T> component:
function QuestionMetadata<T>(props: { question: Question<T> }) {
  const { question } = props

  const requiredElement = question.required ? (
    <span className="text-danger"> *</span>
  ) : null

  const descriptionElement =
    question.description && question.description !== '' ? (
      <p className="text-small text-muted">{question.description}</p>
    ) : null

  return (
    <>
      <p>
        {question.title}
        {requiredElement}
      </p>
      {descriptionElement}
    </>
  )
}
Now, each question component can focus on rendering what is specific to that question type:
function QuestionShortText(props: { question: Question<ShortText> }) {
  return (
    <>
      <QuestionMetadata question={props.question} />
      <div className="form-group">
        <input className="input-block" type="text" readOnly={true} />
      </div>
    </>
  )
}

// ...

function QuestionSingleChoice(props: { question: Question<SingleChoice> }) {
  return (
    <>
      <QuestionMetadata question={props.question} />
      <fieldset className="form-group">
        {props.question.definition.map((choice) => {
          return (
            <label className="paper-radio">
              <input type="radio" value={choice} disabled={true} />{' '}
              <span className="inline-block">{choice}</span>
            </label>
          )
        })}
      </fieldset>
    </>
  )
}

// ...
When all question types have been implemented as React components, start the development server and view the result in the browser.
It is good practice to periodically check the browser's console for any errors or warnings, notably those produced by React. If you check now, you should see a warning about a missing "key" prop for list items.
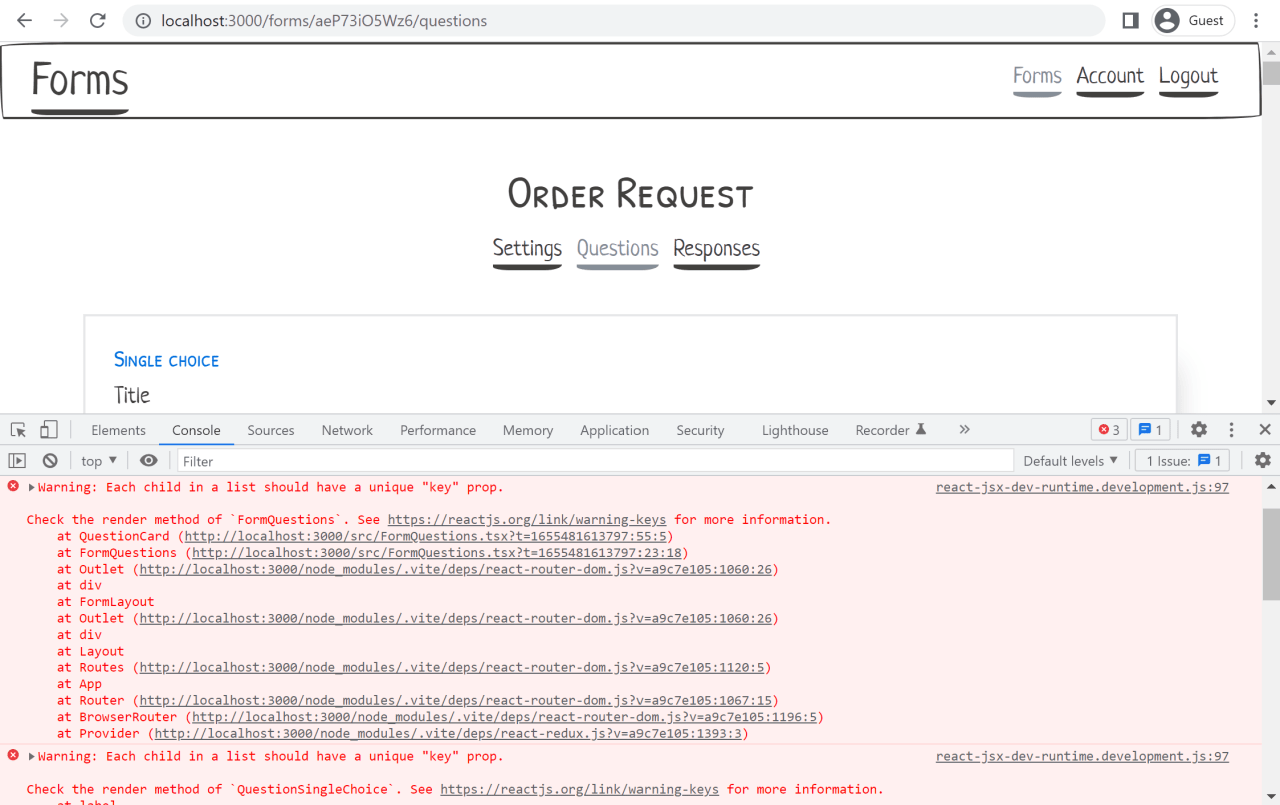
We could try to quickly fix this by using as a key the index of the item in the list. But that is not recommended. If the items in the list are reordered or removed, the indices will change. We need a more stable identifier.
This is an example of a limitation in our data model that we would probably not have noticed if we had not gone through this prototyping exercise and tried to render some sample data on the screen. I've seen this happen in a real setting. The backend did not produce unique IDs for items in a list, and the frontend had to go through all kinds of workarounds to implement the add/remove/edit functionality for that list.
Let's introduce unique IDs for both questions and choices in form.ts:
export type QuestionId = string
export type ChoiceId = string

// ...

export type Question<T> = {
  id: QuestionId
  title: string
  description: string | null
  required: boolean
  definition: T
}

// ...

export type Choice = {
  id: ChoiceId
  value: string
}Note: Here we are using simple type aliases for QuestionId and ChoiceId. In the production version of the feature, we may want to consider newtypes if the programming language supports them. They will prevent us from mistakenly passing a ChoiceId to a function that expects a QuestionId. TypeScript does have a way to emulate newtypes, with libraries that implement it, but it seemed a little too complex to introduce for a prototype.
We now need to update our sample data to include some random IDs (generated using npm run nanoid):
id: aeP73iO5Wz6
name: Order Request
published: true
questions:
  - tag: singleChoice
    question:
      id: 6funH6yhl1w
      title: Are you a new or existing customer?
      description:
      required: false
      definition:
        - id: 26LQFQmxRk5
          value: I am a new customer
        - id: NqJ5OnW2f7h
          value: I am an existing customer
  # ...
Finally, use question.id and choice.id as a key in the rendering functions of FormQuestions.tsx:
export function FormQuestionsList() {
  // ...

  return (
    <>
      {form.questions.map((formQuestion) => (
        <QuestionCard
          key={formQuestion.question.id}
          formQuestion={formQuestion}
        />
      ))}
    </>
  )
}

// ...

function QuestionSingleChoice(props: { question: Question<SingleChoice> }) {
  return (
    <>
      <QuestionMetadata question={props.question} />
      <fieldset className="form-group">
        {props.question.definition.map((choice) => {
          return (
            <label key={choice.id} className="paper-radio">
              <input type="radio" value={choice.value} disabled={true} />{' '}
              <span className="inline-block">{choice.value}</span>
            </label>
          )
        })}
      </fieldset>
    </>
  )
}

// ...
Again, see form.ts for the full data model, data/ for all of the sample data, and FormQuestions.tsx for the complete rendering logic.
Using HTML forms
In the previous section, we iterated and converged on a data model for questions that we are happy with. Rendering sample questions as low-fidelity React components helped us refine that data model. It also provides an illustration we can use when discussing the feature with other developers and non-developers, such as UX designers or Product Managers.
Remember that this is a prototype. We don't mean to implement the full functionality of the feature. The point we have reached now wouldn't be a bad place to stop. However, we'll push the exercise further and implement more CRUD behavior for questions. This will allow us to cover additional techniques that could be useful in your prototyping work.
Previously, the research was focused on how to represent data. In this section, we'll use the prototype to explore and showcase different application behaviors, notably how to add or edit a question.
From a technical perspective, it will also be an opportunity to learn or review how to handle HTML forms and their state with React. With controlled inputs and state hooks, HTML forms in React can involve some boilerplate. Being familiar and comfortable with these concepts can help you move faster, which is important for prototyping.
In this article, we will stick with "vanilla" React forms to keep it simple. But if forms are central to your prototype and you require many of them, introducing a library such as Formik or React Hook Form could be worth it.
Let's start with the functionality to create a new question. In FormQuestions.tsx, add a new component QuestionCreate:
function QuestionCreate(props: { formId: FormId }) {
  const { formId } = props
  const dispatch = useAppDispatch()
  const initialFormQuestion: FormQuestion = newFormQuestion('shortText')

  const [showQuestionCreate, setShowQuestionCreate] = useState(false)
  const [questionType, setQuestionType] = useState<QuestionType>(
    initialFormQuestion.tag
  )
  const [formQuestion, setFormQuestion] =
    useState<FormQuestion>(initialFormQuestion)

  // ...

  return (
    <div className="card margin-bottom">
      <div className="card-body">
        <h5 className="card-subtitle">New question</h5>
        <form onSubmit={handleSubmit}>
          <div className="form-group">
            <label htmlFor="questionType">Question type</label>
            <select
              id="questionType"
              value={questionType}
              onChange={handleQuestionTypeChanged}
            >
              {allQuestionTypes.map((type) => (
                <option key={type} value={type}>
                  {showQuestionType(type)}
                </option>
              ))}
            </select>
          </div>
          {renderQuestion()}
          <div className="row flex-right">
            <input
              type="button"
              className="paper-btn margin-right"
              onClick={handleCancel}
              value="Cancel"
            />
            <input
              type="submit"
              className="paper-btn btn-primary"
              value="Add"
            />
          </div>
        </form>
      </div>
    </div>
  )
}
The newFormQuestion: (questionType: QuestionType) => FormQuestion helper returns an empty question to use as the form's initial values.
There are three calls to the useState() React hook in this component. With the first piece of state showQuestionCreate: boolean, we want to showcase the behavior where the form toggles on and off by clicking "Add question" or "Cancel". Let's add the necessary handler and early return statement for this:
function QuestionCreate(props: { formId: FormId }) {
  // ...
  const resetForm = () => {
    setQuestionType(initialFormQuestion.tag)
    setFormQuestion(initialFormQuestion)
  }

  const handleCancel: React.MouseEventHandler = (e) => {
    e.preventDefault()
    setShowQuestionCreate(false)
    resetForm()
  }

  if (!showQuestionCreate) {
    return (
      <p className="row flex-right">
        <button
          className="btn-primary"
          onClick={() => setShowQuestionCreate(true)}
        >
          Add question
        </button>
      </p>
    )
  }
  // ...
}
With the second piece of state, questionType: QuestionType, we want to showcase the behavior where selecting a different question type displays different inputs depending on the question's specific attributes. Let's add the necessary event handler and a render function that will switch on the question type:
function QuestionCreate(props: { formId: FormId }) {
  // ...
  const handleQuestionTypeChanged: React.ChangeEventHandler<
    HTMLSelectElement
  > = (e) => {
    const type = e.target.value as QuestionType
    setQuestionType(type)
    setFormQuestion(newFormQuestion(type))
  }

  const renderQuestion = (): JSX.Element => {
    switch (formQuestion.tag) {
      case 'shortText':
        return (
          <QuestionShortTextEdit
            question={formQuestion.question}
            onQuestionChange={(question) =>
              setFormQuestion({ tag: 'shortText', question: question })
            }
          />
        )
      case 'longText':
        return (
          <QuestionLongTextEdit
            question={formQuestion.question}
            onQuestionChange={(question) =>
              setFormQuestion({ tag: 'longText', question: question })
            }
          />
        )
      // ...
      default:
        const _exhaustiveCheck: never = formQuestion
        return _exhaustiveCheck
    }
  }
  // ...
}

The components suffixed with Edit also have their own state, which they bubble back up thanks to the onQuestionChange prop. We also extract QuestionMetadataEdit to re-use across question types for common attributes.
function QuestionShortTextEdit(props: {
  question: Question<ShortText>
  onQuestionChange: (question: Question<ShortText>) => void
}) {
  const { question, onQuestionChange } = props

  return (
    <>
      <QuestionMetadataEdit
        question={question}
        onQuestionChange={onQuestionChange}
      />
    </>
  )
}

function QuestionMetadataEdit<T>(props: {
  question: Question<T>
  onQuestionChange: (question: Question<T>) => void
}) {
  const { question, onQuestionChange } = props

  const handleTitleChange: React.ChangeEventHandler<HTMLInputElement> = (e) =>
    onQuestionChange(
      produce(question, (draft) => {
        draft.title = e.target.value
      })
    )

  // ...

  return (
    <>
      <div className="form-group">
        <label htmlFor="title">Title</label>
        <input
          type="text"
          id="title"
          name="title"
          className="input-block"
          value={question.title}
          onChange={handleTitleChange}
        />
      </div>
      {/* ... */}
    </>
  )
}
The main thing to call out here is that we use the produce function from Immer to update the React component state with immutable data structures. Immer should already be installed with Redux Toolkit.
The last piece of state of QuestionCreate is formQuestion: FormQuestion. It gets updated by our question-specific components suffixed with Edit. We then use this state in the submit handler to dispatch a new questionAdded Redux action:
import { questionAdded } from './formsSlice'
// ...

function QuestionCreate(props: { formId: FormId }) {
  // ...
  const handleSubmit: React.FormEventHandler = (e) => {
    e.preventDefault()
    setShowQuestionCreate(false)
    resetForm()
    dispatch(questionAdded(formId, formQuestion))
  }
  // ...
}
The questionAdded() action creator in formsSlice.ts follows a similar pattern to the one that adds a new form. We keep side effects out of the reducer and use the prepare attribute, in this case to generate a new random question ID:
import { generateQuestionId } from './form'
// ...

export const formsSlice = createSlice({
  name: 'forms',
  initialState,
  reducers: {
    // ...
    questionAdded: {
      reducer: (
        state,
        action: PayloadAction<{ formId: FormId; formQuestion: FormQuestion }>
      ) => {
        const { formId, formQuestion } = action.payload
        state[formId].questions.push(formQuestion)
      },
      prepare: (formId: FormId, formQuestion: FormQuestion) => {
        return {
          payload: {
            formId: formId,
            formQuestion: produce(formQuestion, (draft) => {
              draft.question.id = generateQuestionId()
            }),
          },
        }
      },
    },
  },
})
Editing an existing question is similar to adding a new question. We also re-use the components suffixed with Edit. We won't cover the implementation here in detail, see FormQuestions.tsx for the full source code.
With the edit functionality, we can showcase the behavior of toggling between a "view" and "edit" version of the question, by clicking the "Edit" and "Cancel" buttons respectively.
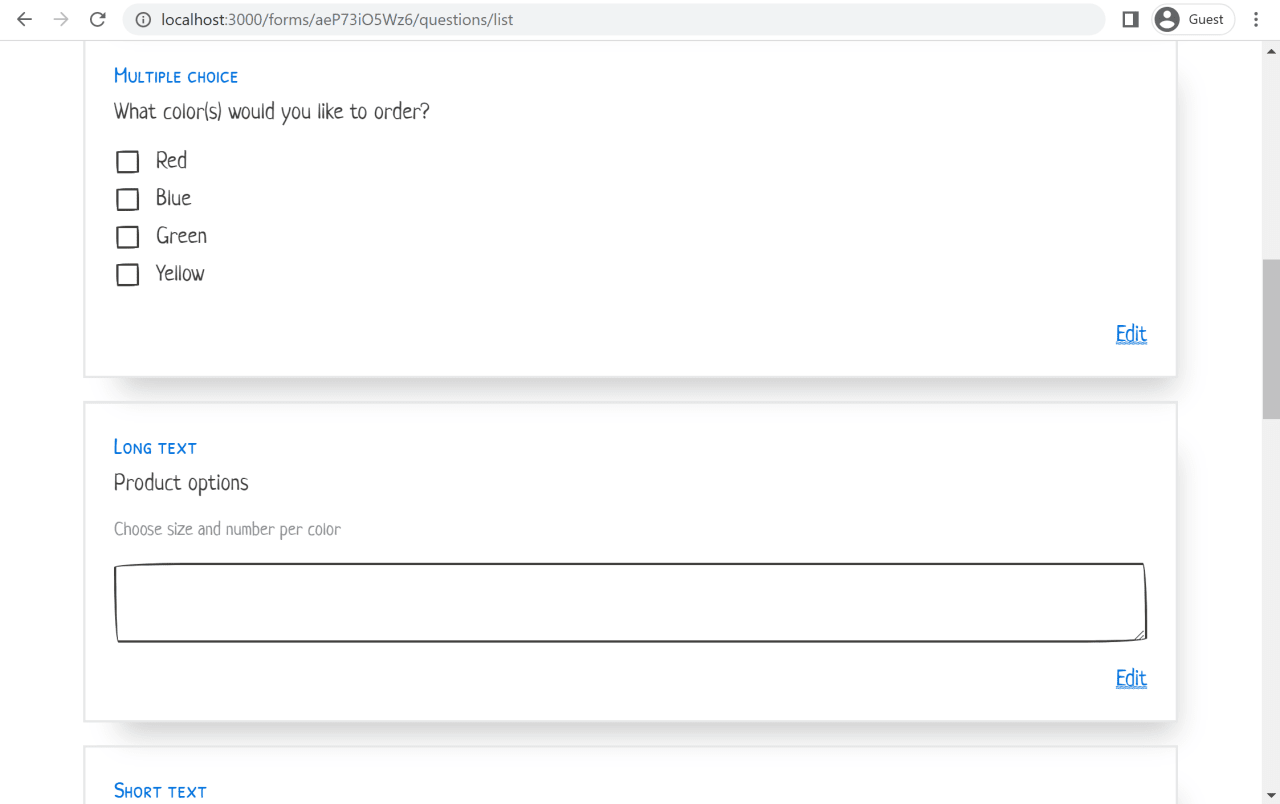
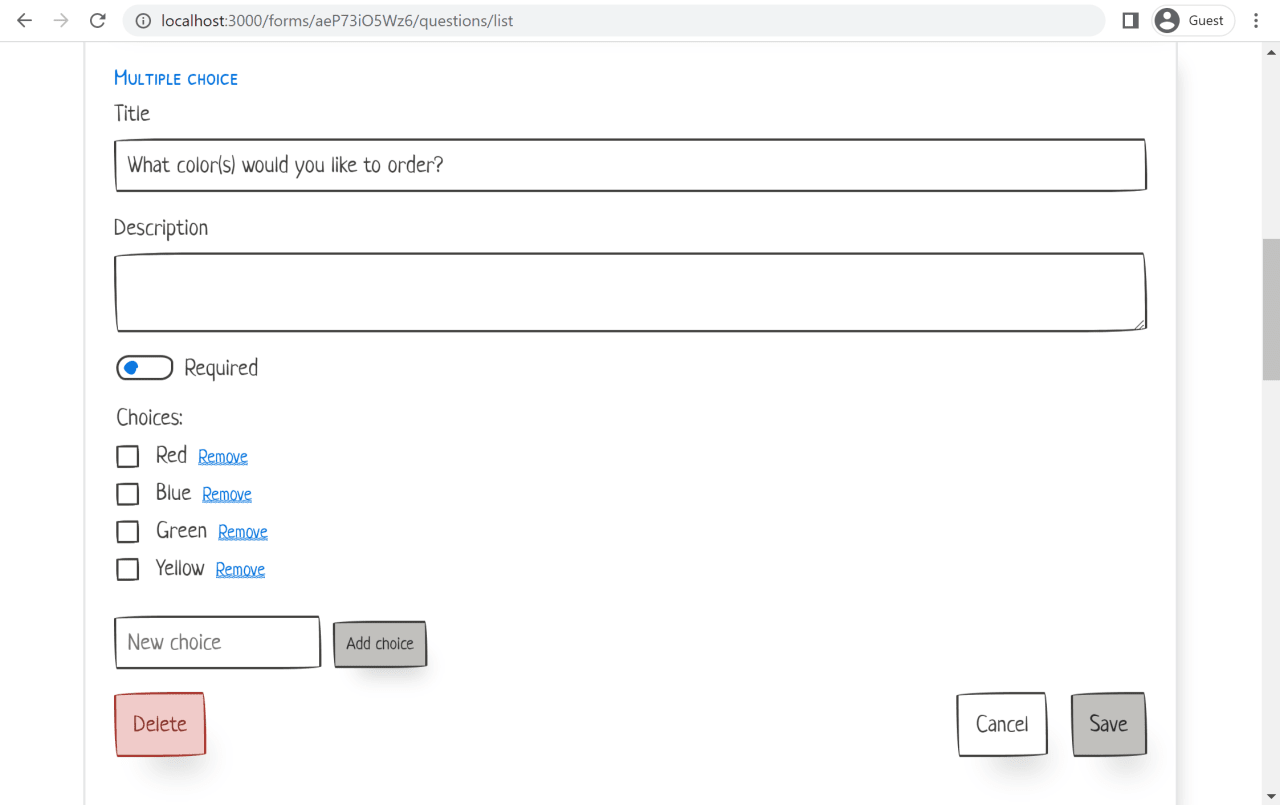
Prototyping these forms also allows us to demonstrate interesting behavior such as adding and removing choices for single and multiple-choice questions.
While these types of UI interactions could be represented as Figma mockups, it is valuable to have a live prototype that you can interact with. I've used this in the past to suggest alternative and simpler implementations of certain features to UX designers.
Generating random data
As stated earlier in the article, prefer using real data when available. You may need some post-processing to get it in the right shape, but the overhead is worth it. If real data is not available, then we have the fallback option of generating random data. This is what we'll use to create sample data for responses in our online form creator example.
With the form and questions sample data, we were focused on data modeling and using sum types to represent different kinds of questions. With the responses sample data, we will focus on the quantity of data. This is useful to prototype things such as pagination, how to handle partial or missing data, and other edge cases. With code, handling ten items or hundreds of items is the same amount of work. This is where prototyping in the browser has a clear advantage over static mockups such as Figma.
We'll use the Faker library to create random data. It includes a lot of common generators such as name, email, phone number, Lorem ipsum, etc. You can also easily create your own generators with functions such as number() and arrayElements(). For instance, we'll use these to create generators for single choice and multiple choice responses.
Create a new file data/generate-responses.ts. We'll run it as a script to produce a .csv file. This file will be checked-in the repository, and then loaded using the vite-content-plugin installed earlier. There are a couple of reasons we do this instead of generating random data at runtime. First, we want to mimic using real data, in which case we would've probably gotten our hands on an export file such as a CSV containing response data for some existing forms. Second, at the time of writing Faker doesn't take a seed as input, so the data will be re-generated to a different set every time we make a change to our prototype, which would be distracting. Finally, Faker is a large library so this allows us to keep the JavaScript bundle size smaller and the development feedback cycle slightly quicker.
The structure of our data/generate-responses.ts script looks like this:
import * as fs from 'fs'
import { faker } from '@faker-js/faker'
import { stringify } from 'csv-stringify/sync'

type ResponseDefinition = {
  question: string
  response: ResponseGenerator
}

type ResponseGenerator = () => string

const generateFormResponses = (
  definitions: Array<ResponseDefinition>,
  count: number
): Array<Array<string>> => {
  // ...
}

const orderRequestResponses: Array<ResponseDefinition> = [
  // ...
]

// response definitions for other forms...

const run = () => {
  fs.writeFileSync(
    './src/data/order-request-responses.csv',
    stringify(generateFormResponses(orderRequestResponses, 154))
  )

  // generate responses for other forms...
}

run()
We use csv-stringify and Node's fs module to serialize and write the data to a file. Since this is a one-off script and performance is not a concern, we can use the sync APIs of both.
Notice that we chose to generate 154 responses for the "Order Request" form. That number is completely arbitrary. We can easily change it to 1,000 or 10,000, and it would not take more code to render it on screen. Unless, of course, it makes us realize that we need to add pagination of some kind.
The random response definitions make use of Faker's generators:
const orderRequestResponses: Array<ResponseDefinition> = [
  {
    question: 'Are you a new or existing customer?',
    response: optional(
      singleChoice(['I am a new customer', 'I am an existing customer'])
    ),
  },
  // ...
  {
    question: 'What color(s) would you like to order?',
    response: optional(multipleChoices(['Red', 'Blue', 'Green', 'Yellow'])),
  },
  // ...
  { question: 'Your name', response: faker.name.findName },
  {
    question: 'Phone number',
    response: () => faker.phone.phoneNumber('###-###-####'),
  },
  { question: 'Email', response: optional(faker.internet.email) },
  {
    question: 'Preferred contact method',
    response: multipleChoices(['Phone', 'Email']),
  },
  {
    question: 'How satisfied are you with our service?',
    response: () => faker.datatype.number({ min: 1, max: 5 }) + '',
  },
  {
    question: 'Questions and comments',
    response: optional(() =>
      faker.lorem.sentences(faker.datatype.number({ min: 3, max: 10 }))
    ),
  },
]
We also create a few helper functions:
const optional = (response: ResponseGenerator): ResponseGenerator => {
  return () => (faker.datatype.boolean() ? response() : '')
}

const singleChoice = (choices: Array<string>): ResponseGenerator => {
  return () => faker.helpers.arrayElement(choices)
}

const multipleChoices = (choices: Array<string>): ResponseGenerator => {
  return () =>
    faker.helpers
      .arrayElements(
        choices,
        faker.datatype.number({ min: 1, max: choices.length })
      )
      .join(', ')
}
See data/generate-responses.ts for the full source.
Note that to be more realistic, some responses should depend on previous responses. For example, the email likely contains a variation of the name. But, in the interest of simplicity and since this is fake data for a prototype, we'll assume that every response is independent. This is another reason it is better to use real data as much as possible. It will contain such patterns and we can make sure our technical design handles them.
We'll run the script without any build step thanks to ts-node. Add an entry to the scripts section in package.json:
"generate-responses": "ts-node --compilerOptions '{\"module\":\"commonjs\"}' src/data/generate-responses.ts"We can now re-generate the data using:
npm run generate-responsesNext, import the files in data.ts, and re-export them in a map const responsesData: { [key: FormId]: Array<Array<string>> }.
Create a new Redux slice responsesSlice.ts. This one will be "read-only" and not contain any reducers, since we're focused on displaying responses and not creating them.
import { responsesData } from './data'
// ...

type ResponsesState = { [key: FormId]: FormResponses }

export type FormResponses = {
  header: Array<string>
  responses: Array<Array<string>>
}

const initialState: ResponsesState = Object.fromEntries(
  Object.entries(responsesData).map(([key, rows]) => [
    key,
    {
      // First row contains header
      header: rows.length > 0 ? rows[0] : [],
      responses: rows.slice(1),
    },
  ])
)

export const reponsesSlice = createSlice({
  name: 'responses',
  initialState,
  reducers: {},
})

// ...
See the full responsesSlice.ts file for more details. Remember to hook up this new reducer to store.ts.
Next, update the placeholder FormResponses.tsx component to contain a simple HTML table with all of the responses:
// ...
import { selectFormResponses } from './responsesSlice'

type Params = {
  formId: FormId
}

function FormResponses() {
  const params = useParams() as Params
  const { header, responses } = useAppSelector((state) =>
    selectFormResponses(state, params.formId)
  )

  return (
    <>
      <p>
        Responses: <strong>{responses.length}</strong>
      </p>
      <div className="table-container-scroll">
        <table className="table-scroll">
          <thead>
            <tr>
              {header.map((name, index) => (
                <th key={index} title={name}>
                  {index === 0 ? '#' : name}
                </th>
              ))}
            </tr>
          </thead>
          <tbody>
            {responses.map((row, index) => (
              <tr key={index}>
                {row.map((response, index) => (
                  <td title={response} key={index}>
                    {response}
                  </td>
                ))}
              </tr>
            ))}
          </tbody>
        </table>
      </div>
    </>
  )
}

export default FormResponses
Start the development server, navigate to a form, and you should now see the responses displayed on the screen:

The first thing we notice is that the horizontal space is insufficient for the responses. We must remember that a form can have any number of questions. In our sample data, it is important to have forms with more than 2 or 3 questions to notice this. I've seen static mockups too often use examples that fit nicely on the screen. But as soon as we implement them with real-world data, we need to revise the design.
In this case, we'll add basic horizontal scrolling to handle the variable number and length of responses. There might be another solution with a nicer user experience, but that is not the objective of the prototype. The horizontal scrolling will be enough to point out this concern to our UX team, when we review this research work together.
In index.css, add the following rules:
/* Tables
-------------------------------------------------------- */

.table-container-scroll {
  overflow-x: scroll;
}

.table-scroll th, .table-scroll td {
  max-width: 200px;
  overflow: hidden;
  white-space: nowrap;
  text-overflow: ellipsis;
}
Save the file, and flip back to the browser. You should see an improved version of the responses table:

Notice that every table cell is set to a max width of 200px, and any overflowing content will be truncated with an ellipsis. In the React component above, we use the title HTML attribute to add a simple hover affordance to view the whole content when truncated.
A first enhancement could be to set the max width based on the question type. For instance, LongText would typically be given more room than ShortText.
A second enhancement could be to allow the user to click on a single row. This would open a modal with the response details displayed in a vertical layout.
These UX improvements are all probably out of scope for this prototyping work. But working in the browser and with realistic data has allowed us to notice these concerns. Our prototype can then serve as a basis for discussions and ideas on how to address them.
Charts and data visualization
The table view above gives the user access to raw response data. But with many responses, having some kind of visualization could be useful, especially for quantitative questions. Let's add some charts to explore visualizing response data. This could even be a standalone prototype.
Designing a data visualization screen is another task where leveraging code and real data has clear advantages compared to only using static mockups such as Figma. I've seen many cases where a chart looks great on a static design with clean, made-up data. But as soon as it is implemented in the application and populated with real data, the chart looks empty and underwhelming.
For example, I recently saw a beautiful Figma dashboard with a sunburst chart as the centerpiece. But once it was implemented, we realized the sunburst chart provided very little value. As another example, in my early work with Tidepool's diabetes data visualization app, I put together a quick prototype using D3.js and a real data set. This allowed me to find that bars for insulin boluses and hovering circles for carbs were a simple visualization that worked well with data that could be both scattered out in time or bunched up close together.
For this article, we'll use a chart library that includes common chart components out of the box (bar chart, line chart, etc.). To stick with the style of PaperCSS and to emphasize that this is a sketch and not a high-fidelity design, we'll use hand-drawn style charts. I ended up picking chart.xkcd (GitHub) for this, which mimics the style of charts found in the famous webcomic xkcd. Another one I tried was roughViz.js, which uses the same Rough.js library that Excalidraw uses. But I found the rendering not as nice as chart.xkcd.
If you need more fancy charts you could look at something like nivo, or even drop down to using D3.js. However, remember that this is only a prototype. Reaching for those libraries with more features might only make sense if the sole focus of the prototype is exploring data visualization.
As I mentioned earlier, most of the value of prototyping data visualizations comes from using real data. Unfortunately for this example of online forms and their responses, I don't have access to real data. So I will cheat a little and hand-craft some sample data. I'll try to create edge cases, such as a pie chart with only one category containing data, because this is something the real data would teach us. We also won't compute the statistics feeding the charts from the raw response data generated earlier. Since it was randomly generated, with a large number of responses we would see an even distribution of selected choices, which is probably not representative of what real data would look like.
Part of this prototyping work is also deciding how this feature will be implemented, and creating a technical design for it. For example, we'll say that the statistics over the aggregate response data will be computed on the backend, possibly cached, and sent back to the frontend via a JSON HTTP API.
Let's work on the shape of that data. Create a new file statistics.ts, with the contents:
import { QuestionId } from './form'

export type QuestionStatistics =
  | { tag: 'bar'; statistics: Statistics<Bar> }
  | { tag: 'pie'; statistics: Statistics<Pie> }
  | { tag: 'scale'; statistics: Statistics<Scale> }

export type Statistics<T> = {
  questionId: QuestionId
  title: string
  data: T
}

export type Bar = Array<{ label: string; value: number }>
export type Pie = Array<{ label: string; value: number }>
export type Scale = {
  startLabel: string
  endLabel: string
  values: Array<{ label: string; value: number }>
}
Notice that we're using sum types again to represent different kinds of charts in QuestionStatistics, similarly to FormQuestion earlier. We use the tag attribute for the type of chart, and a type parameter T for the shape of a chart's data.
Also notice that except for the "scale" chart, we don't differentiate between question types. For example, two different question types can both use the bar chart. This will also make it relatively easier to switch a question to another type of chart.
We'll now create a file for each form, for example data/order-request-statistics.ts, to generate the sample response statistics data. Again, in an actual prototype, we'll prefer to use real data.
In data.ts, import the data files and re-export them with a type annotation. This shape Array<QuestionStatistics> is what our JSON API would likely return for a particular form's data.
import { QuestionStatistics } from './statistics'
import orderRequestStatistics from './data/order-request-statistics'
// ...

export const statisticsData: { [key: FormId]: Array<QuestionStatistics> } = {
  [orderRequest.id]: orderRequestStatistics,
  // ...
}
Add the statistics data to responsesSlice.ts:
export type FormResponses = {
  header: Array<string>
  responses: Array<Array<string>>
  statistics: Array<QuestionStatistics>
}

const initialState: ResponsesState = Object.fromEntries(
  Object.entries(responsesData).map(([key, rows]) => [
    key,
    {
      // First row contains header
      header: rows.length > 0 ? rows[0] : [],
      responses: rows.slice(1),
      statistics: statisticsData[key],
    },
  ])
)
Before rendering this data, we'll create a small wrapper around chart.xkcd to use it in React components. See chart.tsx for the implementation. The library doesn't have TypeScript type definitions, so we'll also need to add declare module 'chart.xkcd' to vite-env.d.ts to avoid getting a type error.
In FormResponses.tsx, replace the existing FormResponses component with three components:
FormResponsesLayoutuses React Router'sOutletto render the table or the statistics chartsFormResponsesNavallows the user to navigate between the table and the statisticsFormResponsesTablecontains the response table implemented earlier
Add a new component FormResponsesStatistics that will render the charts:
import chartXkcd from 'chart.xkcd'
import { BarChart, PieChart } from './chart'
// ...

export function FormResponsesStatistics() {
  const params = useParams() as Params
  const { statistics } = useAppSelector((state) =>
    selectFormResponses(state, params.formId)
  )

  const renderQuestionStatistics = (item: QuestionStatistics): JSX.Element => {
    switch (item.tag) {
      case 'bar':
        return (
          <BarChart
            config={{
              title: item.statistics.title,
              data: {
                labels: item.statistics.data.map((x) => x.label),
                datasets: [
                  {
                    data: item.statistics.data.map((x) => x.value),
                  },
                ],
              },
              options: {
                yTickCount: 4,
              },
            }}
          />
        )
      // ...
      default:
        const _exhaustiveCheck: never = item
        return _exhaustiveCheck
    }
  }

  return (
    <>
      {statistics.map((item) => (
        <div key={item.statistics.questionId} className="chart margin-bottom">
          {renderQuestionStatistics(item)}
        </div>
      ))}
    </>
  )
}
We make use of exhaustiveness checking for our sum type in renderQuestionStatistics, as we did for rendering different question types earlier.
See FormResponses.tsx for the full source.
Finally, update App.tsx with these new routes:
<Route path="responses" element={<FormResponsesLayout />}>
  <Route index element={<Navigate to="table" replace />} />
  <Route path="table" element={<FormResponsesTable />} />
  <Route path="statistics" element={<FormResponsesStatistics />} />
</Route>
Start the development server and navigate to a form's response statistics to see the result.

In this prototyping work, we notice that statistics work well for quantitative questions (scale), or questions with a finite set of possible answers (single or multiple choice). For qualitative questions (short or long text), we decided to display some statistics on the length of the answer (number of words), grouping them into buckets. We used a pie chart, but perhaps a histogram would have been more appropriate. We could've also left out statistics for qualitative questions altogether, as the analysis of the raw answers is more valuable. These are all good discussion points that the prototyping work helps discover.
Data export
The last feature we'll add to our prototype is the ability to serialize and preview the sample data directly in the UI.
We'll serialize the form questions as YAML, and add a screen to show the output in a code block. We'll also serialize the form responses as CSV. The output for those will look like the files we have checked in the data/ directory.
This isn't necessarily a feature that we want to add to the real product, but I found it useful in the prototype for a couple of reasons.
First, if we create sample data for questions using the CRUD functionality of the prototype, we can easily copy-paste the result from the YAML screen into a file in the data/ directory. This can speed up the sample data creation workflow.
Second, we can use the feature to quickly show developers what the data behind the UI looks like, without having to switch to a code editor or the browser developer tools. Even for non-developers, such as the UX team, I've found it useful to show a preview of what the data looks like "under the hood". This helps build a common understanding between developers and the design team.
To serialize the questions as YAML, we'll use js-yaml, which is the same library used by vite-plugin-content.
At the time of writing, this library doesn't have TypeScript type definitions. In the interest of speed, we'll declare the module as any. To do so, add the line declare module 'js-yaml' in vite-env.d.ts.
To serialize the responses as YAML, we'll use csv-stringify, the same library we used in our Node script to generate the random data files. We'll just need to make sure to import the browser version, which contains polyfills for Node dependencies such as streams (see the Browser ESM section in the library documentation).
In FormQuestions.tsx, similarly to what we did when we added the response statistics, split the FormQuestions component into:
FormQuestionsLayoutuses React Router'sOutletto render the list of questions or the YAML data exportFormQuestionsNavallows the user to navigate between the list and the YAMLFormQuestionsListcontains the questions list implemented earlier
Next, add a new FormQuestionsYaml component to display the serialized questions:
import yaml from 'js-yaml'
import Code from './Code'
// ...

export function FormQuestionsYaml() {
  const params = useParams() as Params
  const form = useAppSelector((state) => selectFormById(state, params.formId))

  return <Code language="yaml" code={yaml.dump(form.questions)} />
}
See FormQuestions.tsx for the full source.
In FormResponses.tsx, we already have a subnav component FormResponsesNav. Add a link to it that navigates to the CSV screen.
Next, add a new FormResponsesCsv component:
import { stringify } from 'csv-stringify/browser/esm/sync'
import Code from './Code'
// ...

export function FormResponsesCsv() {
  const params = useParams() as Params
  const { header, responses } = useAppSelector((state) =>
    selectFormResponses(state, params.formId)
  )

  return <Code language="csv" code={stringify([header].concat(responses))} />
}
Update the routes in App.tsx:
<Route path="questions" element={<FormQuestionsLayout />}>
  <Route index element={<Navigate to="list" replace />} />
  <Route path="list" element={<FormQuestionsList />} />
  <Route path="yaml" element={<FormQuestionsYaml />} />
</Route>
<Route path="responses" element={<FormResponsesLayout />}>
  <Route index element={<Navigate to="table" replace />} />
  <Route path="table" element={<FormResponsesTable />} />
  <Route path="statistics" element={<FormResponsesStatistics />} />
  <Route path="csv" element={<FormResponsesCsv />} />
</Route>
Finally, we'll add some syntax highlighting for the serialized output using Prism.
Create a new Code.tsx component, which we'll use to wrap Prism in React (roughly following this tutorial). We'll make use of the useEffect() hook, as well as Prism.highlightAll():
import { useEffect } from 'react'
import Prism from 'prismjs'
import 'prismjs/components/prism-yaml'
import 'prismjs/components/prism-csv'

export default function Code(props: { code: string; language: string }) {
  const { code, language } = props

  useEffect(() => {
    Prism.highlightAll()
  }, [])

  return (
    <pre>
      <code className={`language-${language}`}>{code}</code>
    </pre>
  )
}
Notice that we need to import the Prism language definitions that we need (in this case YAML and CSV). Doing it this way is fine for a prototype. For a production application, we'll probably want to use something like babel-plugin-prismjs (see the Prism documentation).
We'll also need to add declare module 'prismjs/components/*' to vite-env.d.ts.
In main.tsx, import the CSS file for the default Prism theme (or prism-<theme>.css, replacing <theme> with one of those provided by Prism):
import 'prismjs/themes/prism.css'We'll also adjust the font size by adding some small overrides to the theme in index.css:
/* Code blocks
-------------------------------------------------------- */

code[class*="language-"], pre[class*="language-"] {
  font-size: 16px;
}
Start the development server, and navigate to a form's questions. Then select the YAML tab to see the serialized data:

Similarly, on the form's responses page, select the CSV tab to see the serialized output:

Bonus: Deploying to Netlify
The actual prototype my team used for the technical design of a feature was only run locally and screen shared over Google Meet. So there was no need to host it anywhere.
But you may want to give coworkers access to the prototype, so they can look at it outside of a meeting. In that case, you need to make it available at a URL they can reach. Also, the source code containing the data model is probably as valuable as the UI. So make sure to share the code as well, using a private GitHub repository for example.
One quick way to share the single-page app would be to run it on your machine and expose it to your local network. Vite has that functionality built-in, using the preview command with the --host option:
npm run build
npm run preview -- --host
Another option, which I used for the example in this article, would be to host it remotely using a service such as Netlify. In that case, keep in mind that the prototype UI will be public to anyone that knows the URL. However, Netlify by default generates random URLs that are hard to guess. This semi-privacy might be enough for your use case. Paid plans also offer site-wide password protection, so that is an option for prototypes that need to be truly private.
Deploying a static site to Netlify is straightforward and well-documented. Here, I'll highlight the specific steps I took for this example.
First, add a public/robots.txt file that tells search engine crawlers not to index the site if ever they come across it:
User-agent: *
Disallow: /Note: Anything in the public/ directory is picked up by Vite and copied over to the build output.
Next, add a netlify.toml configuration file at the root of the project directory:
[build]
  publish = "dist"
  command = "npm run build"
You don't strictly need to do this. Netlify is good at automatically detecting that a site is using Vite as the build tool. But I prefer to be explicit.
We'll also use the netlify.toml configuration file to add a redirect rule. It will make refreshing the page work when the URL contains a path other than the root path (for example /forms/aeP73iO5Wz6):
[[redirects]]
  from = "/*"
  to = "/index.html"
  status = 200
Commit the changes and push them to the remote repository. We'll be using GitHub in this example.
From the Netlify dashboard, click "Add a new site" and select "Import existing project". Choose GitHub as the Git provider. If the prototype is in a private repository, you may need to authorize access to that repository by going to "Configure the Netlify app on GitHub".
After the build finishes, check the result by navigating to the .netlify.app URL that was generated for this site.
Optionally, customize the URL by changing the site name. In this case, I changed it to example-typescript-prototype.
You can view the full prototype built in this article at example-typescript-prototype.netlify.app.
Wrapping up
Putting together a small prototype can be very useful when designing a new feature. The prototyping work helps guide the technical design and data modeling. It allows the team to validate assumptions with real data and code. The prototype and its source code can be used as supporting material during meetings, resulting in less hand-waving and more efficient discussions.
In this article, I used the made-up example of an online forms creator, similar to Google Forms, to illustrate a prototyping workflow. I gave a detailed walkthrough on how to set up and implement the prototype, using libraries such as React, Redux, React Router, a CSS framework, and the Vite build tool. Of course, this is only one way of doing things. But if you like the approach and follow these steps, it may help you spend less time choosing libraries and setting up tools. This will free up time to focus on the more important prototyping and technical design work.
The full source code for the example is available on GitHub, and the prototype is hosted here.